
Gordian Knot
Start up Gordian Knot, select a free slot in the dropdown list at the bottom right of the window, click rename to give it a good name and all your settings will be saved in this slot and can be re-used later on.

Then go to the bitrate tab.
Load the DVD2AVI project file (.d2v) by clicking on the Open button and selecting the .d2v file you've created before.
 If you
did not chose Force Film in DVD2AVI due to a too low film content you can perform
IVTC during encoding. You'll activate IVTC upon saving the avs file (later on
in the guide) but first you should already set FPS to 23.976 so that the correct
number of frames for the resulting movie will be shown.
GKnot automatically reads the number of frames and the framerate from the .d2v file. If you get a "'GordianKnot.exe - Entry Point Not Found The procedure entry point _getRGBFrame@4 could not be located in the dynamic link library mpeg2dec.dll" error message you have used the regular mpeg2dec.dll file and not the one I have listed at the beginning of this guide. Download that special version, place it in the Gordian Knot directory and try again. This will open another window where you can see the video. Put that window in the background but do not close it.
Now set your desired filesize and number of CDs:
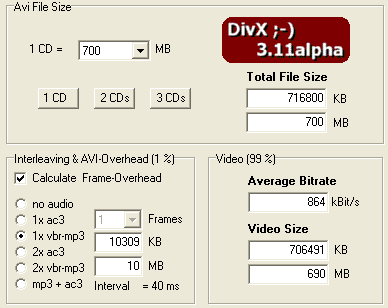 This is pretty straightforward.
Enter the CD size, click on the X CD button or enter a filesize manually.
Also set the interleaving values according to what you're going to make. If you use VBR MP3 it is important that you check VBR-MP3 to take care of the muxing overhead that this fileformat has.
 Also configure the audio options.
If you have a CBR file simply select that from the dropdown list. Or in any
case you can enter the size of the file. If you have a second audio track also
enter the size or bitrate of it.
Last but not least let's set the right codec:

Obviously you'll want to select Divx 3 as Nandub cannot handle Divx 4.
Then click on the Resolution tab. The first step is the cropping.
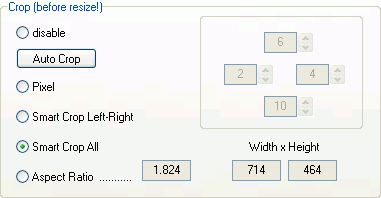 Press the
Auto Crop button. GKnot will go thru a couple of frames in the preview window
then you'll see the results. If they are about what you'd expect select Smart
Crop will will give you the ideal crop values to minimize the aspect ratio error.
If this doesn't work as planned you can proceed using the old fashioned method: First check Pixel, then use the buttons to crop away the black bars completely on each side until what you see in the movie window is just the part of the video stream that really contains the movie.
Then press Smart Crop All. The program will then select cropping values that respect the aspect ratio of the currently visible picture while also fulfilling the W-Modul and H-Modul values. These values indicate what the vertical, respectively horizontal size have to be multiples of. You should at least put 16x there for both values, 32x is only necessary for certain graphic cards when you use them with TV output (Matrox G400 is such a card).
There's another issue here: If you go to the options tab again you will find the "Follow ITU-R BT.601 Standard" button. As I'm one of the people who thinks PC resizing is okay (and in fact every of my guides is written to respect that resizing rather than this ITU standard) I deactivate this option.
Then set the DAR according to what DVD2AVI told you. That is either 16:9 or 4:3.
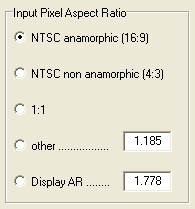 You can go
to the window that shows your video and select resized from the view menu and
check if it truly looks okay. And while you're at it, move the slider to advance
in the movie until the end credits start and press the Set Credits Start button.

Now you have to set the resolution by moving the slider shown below:

You can see the Aspect Ratio error in one of the fields, and as you can see the results are close to perfect. You also have to keep watching the Bits/Pixel values (Output resolution):
![]()
It's a bit guesswork as you cannot predict compressibility of your movie but here's some hints:
Depending on the value you have here GKnot will set a resizing method and you should usually stick with it.
Last but not least you may want to add subtitles. If so, go to the subtitle tab and press the Configure button.

Then press the Open button and select the ifo file from your movie. You'll then be presented with the following screen:
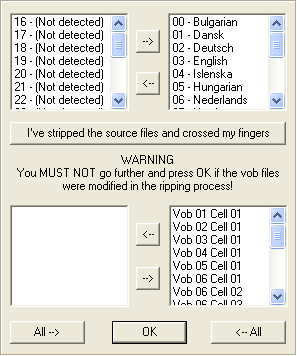 Normally everything should work
fine if you just press OK but if it doesn't press the "I've stripped the
source files and crossed my fingers button". You'll be asked to provide
a directory where to save the indexed files. 3 files will be created in the
directory you've provided: vts_01_0.ifo, vts_01_0.idx and vts_01_0.sub. Leave
these files alone for the moment. The filenames will differ according to the
name of the .ifo file you load, in this case I loaded vts_01_0.ifo so all files
will be called vts_01_0.*
Upon completion of the process you can position the subtitles and change the color combination in the window that you've seen before. Once you're done press OK. Note: GKnot also gives easy access to the subtitle synching tool that comes with VobSub and the subtitle file cutter so if you should need either of them it's easiest to launch them directly out of GKnot at a later point.
Then go to the preview window and Select Save .avs from the file menu.

Now you have quite a lot of options:
 Gordian Knot will select
a resizing filter for you depending on the bitrate. If you don't like its selection
modify it. I always go at least with Soft bicubic as bilinear is too blurry
for my eyes but that's a personal choice.
 Then
we have some more filtering options: Field operations should be obvious. If
you have an interlaced source you can deinterlace it, or in case of an NTSC
source where you deactivated Force Film in DVD2AVI you can select Inverse Telecine.
Make sure that you've set the right framerate as described at the beginning
of this page or the bitrate calculations will be completely off.
If you're dealing with a noisy source you can also select a noise filter of your likings.
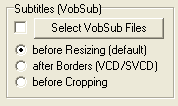 Then
the subtitles. Here you are at a crossroads: If you want permanent subtitles
press the Select VobSub Files button and select the ifo file from the 3 files
that VobSub has created for you. If you prefer to have subtitles that you can
switch on and off during playback and in multiple languages you're better off
using DirectVobSub (part of the VobSub package) during playback instead of "burning"
them into the AVI. The after Borders option is for VCD/SVCD creation only and
does not concern us.
And last but not least the compressability check (Note for the people who came here via the DivX4 guide: it's time to save the avs right now and press the back button on your browser!).
 It's
possible to run a short first pass to find out the optimal compressability of
a movie (and make an even better resolution choice). Turn the Compressability
check on and set it to 5%, then save the avs, load it in Nandub (Control - O)
and press F8 to do a first pass. This will only encode 5% of the movie so it's
rather quick (provided you have reasonable hardware). Write down the name of
your stats file as you're going to use it later on.
Once you're done check the Bits/(Pixel*Frame) value in Gknot as shown below.

Values between 60% and 100% mean good quality, below 60% the quality will be inferior so you should compensate by reducing the resolution (you'll see how the value adjusts.. if the field background is white it's ok, if it's yellow it's critical but can still look good and if it's red it will look bad, period). The ideal range is 65% - 75%, above that value you could select a higher resolution. Once the value is in the acceptable range, save the avs again but this time turn off the Compressability Check off. Also, select trim:
 This
way the end credits will be encoded in constant quality mode at a really low
bitrate and then appended to the main movie.
Now the encoder tab comes up:

Select First Pass instead of both passes or you won't get the possibility to changes values manually. Now press the Add Job to Encoding Queue button and wait until the operation has finished.
Once it's done come back into GKnot, then go to the "Nandub Files" tab and open your stats file by pressing the Open button. (note that you can see the name of the stats file you're going to get in the encoder tab before you start the first pass).

Span and Sensitivity are values for GKnot's internal motion detection. I suggest you leave it at the default 15/15. At the bottom of the screen you'll see if your resizing prior to the first pass was good enough:

Video Size / First Pass Size should be between 60 and 100% (so obviously the resolution I have chose for the stats file I've loaded to make this screenshot was way too high) . If it's above 100% you will not reach your filesize in the second pass. If it's below 60% the quality will not be good. If it's between 65 and 75% you will get the best possible results. If you're between 75 and 100% you could have chosen a higher resolution.
If you want to put keyframes at certain defined positions you can proceed with the instructions. Otherwise just skip this step.
Click on the Stats File Editor Tab and check Graph (that is the checkbox without a label).
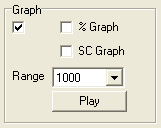 If
you check SC Graph you'll see the scene changes in the graph as well.
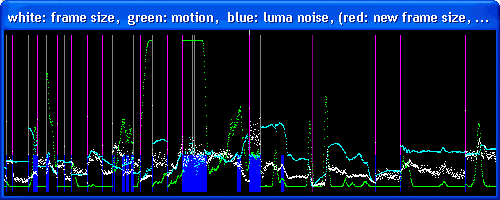 You can
read in the title of this window what each color stands for.
A dark gray line is a scene change, a light gray line a keyframe in the first pass (first frame or keyframe created with an .ecf file), a dark purple line is a keyframe, a light purple line a keyframe on a scene change.
So far nothing has been changed so you can still skip this step.
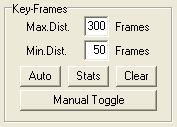 Here
you can set the minimum and maximum distance between 2 keyframes. Press Clear
to clear the default keyframe distribution, then use the big slider in the lower
half of the window to move to a certain position where you want a keyframe and
press the Manual Toggle button once you're there. Repeat this for every keyframe
you want to force, then press the Auto button the add the rest of the keyframes
automatically according to the Min and Max distance.
If you press the Play button in the Graph section you will see the movie play along with the graph so you can see if you have put the keyframes at the appropriate positions.
Now go back to the Nandub files tab, make sure that motion, keyframes and delta-frames are checked

then press the Save button and write down the name of the .ecf file. If you check selection only you can create a partial ecf file to overcome the 3mb size limit of Nandub for ECF files (refer to the readme of GKnot for more info).
Then you can set a minimum bitrate for the video and activate luma-correction:

Framesize correction enforces the min bitrate, Motion Correction is a pretty much corresponds to the motion based bitrate modulation in nandub, except that it depends on GKnot's own motion calculations. Luma Correction is the same as in the regular Nandub. If you feel up to it you can press the Customize button for each option and mess around with it on your own, but I strongly suggest you only do that if you're perfectly familiar with what each option does. After setting all this it's time to write a new stats file so press the calculate button and then the save button.

BTW, the red graph you get in the graph window is the bitrate curve for the second pass, and if you checked %Graph the yellow line will show the First-pass/second-pass ratio which tells you roughly what DRF level (quality) you're going to get. In the stats file editor you can also find another very interesting option: Manual Correction. By selecting a range via the Selection options you can change the properties of the curve by setting another weight and smoother settings then apply them via the push button. I suggest you watch the stats curve window to see what changes you get. And keep in mind that this again is a feature for very advanced users and you can live very well without using it (it will only give a headache to most people ;).
Once everything has been set press the Save & Encode button in the preview window, use the same settings as for the first pass, save your avs files. Then in the encoder tab you select Second pass:

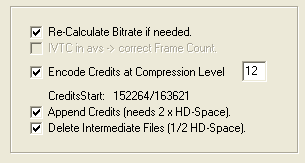 Then
the encoding options. The default values are good. Re-calculate bitrate if needed
should be checked in any case, as should append credits. Also check delete intermediate
files so that only the final AVI remains in the end. Finally you can change
the end credits compression levels if you want to.
Then go to the audio1 tab:
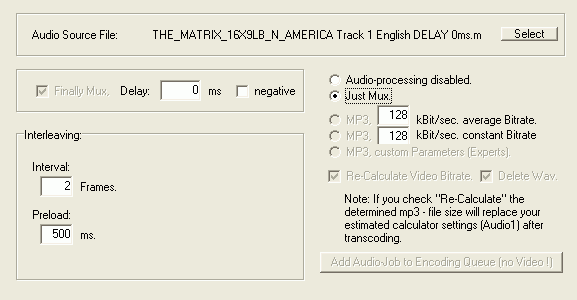
Press the select button and select the AC3 that DVD2AVI has demuxed. If you want to keep the AC3 check Just Mux. Otherwise select MP3 (selected by default actually) and enter the average bitrate you want. For 1 CD that's usually 128kbit/s, for 2 CDs 160kbit/s or higher depending on your priority on video or audio quality (higher audio bitrate = lower video bitrate -> higher audio quality but lower video quality). Re-calculate video bitrate should be checked in any case, and delete wav will save some space so it should be checked, too. Azid is run in 2 pass mode to find the maximum overflow free gain so you won't have to normalize the audio.
Last but not least, if you're up to it you can select Mp3, custom parameters and enter customer parameters for azid and lame on the left side. Just in case, you can use DD's Azid/Lame gui to get your option lines and paste them into GKnot, but the defaults work quite nicely.
Now go back to the DivX3 encoder tab without pressing the Add Audi-Job to Encoding Queue as this would only encode the audio. If you have a 2nd audio track do the same operation again before returning to the DivX3 encoder tab.
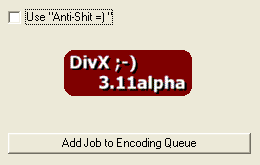 Pressing
the Add Job to Encoding Queue button will add the job you just set up to the
queue. You'll then be asked whether to start encoding or not. This allows you
to add multiple jobs to the queue and then encode them all without any further
manual interaction. It's of course also possible to add jobs while the encoding
is already ongoing by simply starting to follow this guide from the top again
(of course you must not close GKnot and do everything in the already running
instance of GKnot).
>> BACK