Mpeg2Avi guide
Start up the GUI and go to the mpeg2avi section. Click on the Mpeg2avi button and enter the pathname of your copy of mpeg2avi (if you have downloaded the pack it's in the same directory as the GUI). Also load your VOB files. Since you've already created a streamlist in step 2 you can use this as Input.
If you have a PAL movie you can skip the following paragraph.
NTSC sources are usually based on a 24fps progressive source. Using 3:2 pulldown flags that source is turned into a 29.97fps interlaced/progressive stream during playback. You can read more about this in Robshot's guide. Mpeg2avi can't read rff flags and always decodes the encoded MPEG-2 frames. Sometimes the rff flags are not in a regular order, and sometimes there might be a part of the movie (usually the studio logo) which is 29.97fps interlaced without any pulldown flags. This can create havoc for your synchronisation. Hence, when dealing with NTSC sources, when you get asynch video and audio you might want to try out the IVTC flags. An IVTC frame offset of -s4 usually help, but you can also try out others if this shouldn't work for your movie. Remember that this doesn't guarantee synch, it's just a possibility.
Now let's go on with the program.
Mpeg2avi can also demux an audio tracks during ripping but as we're doing audio separately check "Decode Video" and select "No Audio".

 Chose your profile by pressing the Profiles button and select one that suits your needs. Note that for PAL movies all you have to do is load the corresponding NTSC profile, then change the framerate (fps) to f2 (25fps).
If you don't like my profiles (shame on you.. they're pretty good), you can find your own settings. To do so simply select "Maintain Ratio" in (2), uncheck Output Cropping, and both Downsizers. Then press Preview My AVI.

Below this window you should see your movie playing. An important field to take into consideration is "ratio". At the beginning it will show some garbage as shown above, but as soon as you press one of the resize or crop buttons the ratio will change. Now use the resize and crop buttons to resize and crop your movie. You'll see the effects of your settings in real-time. In the end all that's important is that the ratio value corresponds to the aspect ratio of your movie. For instance, for a 1:2.35 movie one possible value is : resize = 640x360, crop = 640x272. You can also see the effect of the IVTC offset in real-time if you press these buttons. Write down this values, go back to the GUI and enter them. The resize value correspond to X and Y dowsizer, and Crop has the same name.
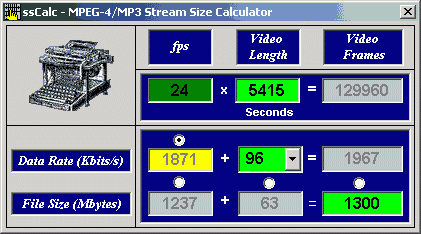
The next step is calculating the bitrate. Press the Calculator button (2nd from the left).
 . Enter the desired output size in the field saying 652, chose the desired bitrate for audio (where it says 96) and enter the video length (length in seconds * framerate - 25fps for PAL, 23.976 for NTSC). Keep in mind that DivX is variable bitrate even if it should be otherwise. More information about bitrate in the bitrate and resolution guide.
Then check the checkbox right of the DivX auto button (3rd button from the left in the button-bar) then press that button. The following window will appear.
 Select Low-Motion Codec, set the desired Keyframe interval (2-4 seconds for 1 CD, 1 second for 2 CDs and more). smoothness should always be at 100% and the Data Rate is what you just calculated in the calculator.
When using the DivX VKI codec you set keyframes to 9999 since the codec automatically inserts keyframes at the appropriate positions.
Now all you have to do is press the Create My AVI button and wait until it has finished.
>> BACK