DVD-9 to DVD-5 "Full Copy" Instructions
NOTE!!!
Please bear in mind that this was written assuming you already have some basic
knowledge of the software tools listed. If you do not, I STRONGLY urge you to
read the guides and do some searches for past posts here on the forum. To explain
every little detail of how to use the software would be totally redundant and
a waste of time for those who have spent the time to LEARN to do things before
asking questions. I don’t mean for this to sound rude but you really should
understand the basics. The guides and previous posts are here for a reason.
Also, this guide only works for single PGC titles (most DVD's ARE). With this
in mind, this guide should still work for most of the titles out there. Please
check Jdobbs' post on the second page of this thread.
Software you will need…
DVD Maestro
CCE
DVD2AVI
SubRip 1.02
Chapter Xtractor
Pulldown.exe
DVD Decrypter or SmartRipper
AVISynth (or VFAPI)
IFOUpdate
I personally use Nero for burning but others will work as well.
A note concerning Nero, version 5.5.8.0 seems to be the magic number. Earlier
versions do not handle DVD Video as well and the current 5.5.8.2 will return
a “One or more files (mostly VOB-file(s)) do not belong to the corresponding
IFOfile” when attempting to burn. This is currently being looked into by myself
and others. For now, just stick with 5.5.8.0 and you’ll be fine.
For the purposes of this example, I am using the DVD “Double Jeopardy”.
It works well for this example. You’ll find most DVD’s will work exactly the
same way. This tutorial does NOT address complex titles such as seamless branching
titles, etc. This is merely to serve as a set reliable method for getting most
DVD-9 titles to DVD-5 or as a starting point for more complex titles.
Where do I begin??
First, you want to have a complete backup of everything on your
original disk. Use the “Backup” option of SmartRipper or "File Mode" option
of DVD Decrypter to copy all of the files to your hard disk. With this example,
we see that the largest set (VTS_02) is the one that contains the movie. It
is approximately 6.44GB in total size. The VTS_03 set is apparently the trailer
since it is only 157MB. The VTS_04 set at 885MB contains the “behind the scenes”
extra. You can choose to dump these but we are keeping them for this example.
Chapters and Subtitles
After you have all of your files on the hard disk, you will want
to begin by getting the simple things out of the way first. These are chapters
and subtitles. Use Chapter Xtractor to load up the VTS_02 set. Make sure the
FPS rate is 29970 (It should default to this anyway). Click the “Format” tab.
Under “Presets” at the bottom, select “DVDMaestro” You should get something
like the following:
$Spruce_IFrame_List
00:00:00:00
00:06:31:06
00:13:25:02
00:20:49:26
00:27:35:01
00:32:29:02
00:40:22:11
00:46:12:00
00:52:36:10
00:58:42:26
01:06:15:21
01:15:18:21
01:21:12:16
01:29:03:16
01:36:16:02
01:40:26:06
Click the “Save Data” button at the bottom and save the file as
a DVD Maestro *.CHP file.
Next, you’ll want the subtitles. There are many different ways
to do this and many are just as valid as another. I’m going to share with you
the way I do them as I have found it to be the most reliable with picking up
special characters, etc.
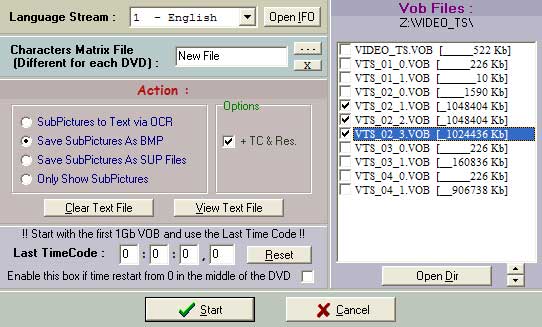 Open SubRip and click
on “File...Open VOB’s”. Make sure under the “Action” section, you have selected
“Save SubPictures as BMP” and there is a checkmark on “+ TC & Res.”. Make
sure the “Last Timecode” is all 0’s and there is no checkmark on “Enable this
box if time...” Click the “Open IFO” button and select an IFO from your backed
up files. It will then list all VOB’s in that directory in the right-hand
window. Place a checkmark on all VOB’s from the movie. Begin with VTS_02_1.VOB
in this example. When you’re ready, click the “Start” button. You will get
a window asking where to save the files. There will be LOTS of them so don’t
go saving them to your desktop or something! I always create a “subs” directory
and dump them in there. Choose any filename you like.
Open SubRip and click
on “File...Open VOB’s”. Make sure under the “Action” section, you have selected
“Save SubPictures as BMP” and there is a checkmark on “+ TC & Res.”. Make
sure the “Last Timecode” is all 0’s and there is no checkmark on “Enable this
box if time...” Click the “Open IFO” button and select an IFO from your backed
up files. It will then list all VOB’s in that directory in the right-hand
window. Place a checkmark on all VOB’s from the movie. Begin with VTS_02_1.VOB
in this example. When you’re ready, click the “Start” button. You will get
a window asking where to save the files. There will be LOTS of them so don’t
go saving them to your desktop or something! I always create a “subs” directory
and dump them in there. Choose any filename you like.
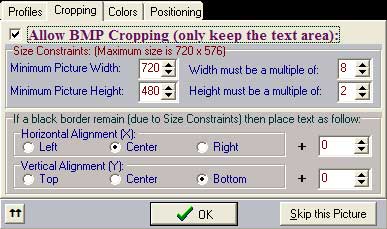

The next window will pop up when the first subtitle is detected.
You will want to select the “Cropping” tab. Place a checkmark on “Allow BMP
cropping”. Select 720 x 480 for minimum picture width and height, respectively.
Width must be a multiple of 8 and height must be a multiple of 2. Horizontal
alignment should be Center and Vertical alignment should be Bottom. Click the
“Colors” tab and select the "Maestro" preset. Under the “Positioning” tab, make
sure you have X and Y on “Keep Original Position”. Click “OK” when you’re ready
to go!
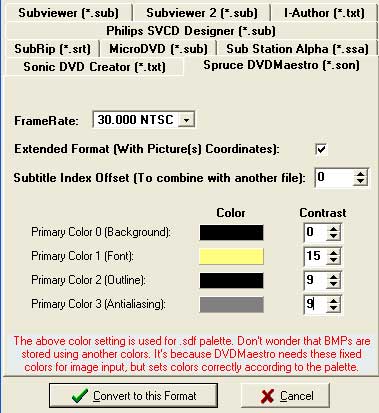 Once the subtitles have been ripped, you will be
presented with a new window containing the subtitle info. For the Output Format,
select the “Spruce DVDMaestro (*.son)” tab and select “30.000 NTSC”. Select
your colors and their respective contrast levels. Click the “Convert to this
format” button. Next, click “File…Save As” and save the Sonic DVD Creator text
file into the same directory you just ripped the subs to.
Once the subtitles have been ripped, you will be
presented with a new window containing the subtitle info. For the Output Format,
select the “Spruce DVDMaestro (*.son)” tab and select “30.000 NTSC”. Select
your colors and their respective contrast levels. Click the “Convert to this
format” button. Next, click “File…Save As” and save the Sonic DVD Creator text
file into the same directory you just ripped the subs to.
Damn! All that and we’re
still not authoring??
Ok, now you need to use CCE to decrease the size of the main movie
so you can fit it on the disc. I’m not going to give detailed use of CCE because
there is info all over the place for it here on the site. You can frameserve
using Avisynth or VFAPI. Did you remember to create your d2v project file using
DVD2AVI? Did you remember to extract your AC3 audio file and use the appropriate
DVD2AVI settings? I told you that you needed to understand the basics first!
Thought you could skip it all, huh? hehe Anyway, if you’re lost, don’t worry.
Read up on using the tools mentioned in this section. There is TONS of info
on them here.
When using CCE, I personally use the “Robshot” method. It can
be found in the guides here and is listed as “Getting the best out of CCE”. For this example, I
found the best setting was a minimum bitrate of 1000, an average of 3500,
and a max of 9000. There were one or two small gray areas in the “car goes
off the ferry into the water” sequence which never changed, even at the max
bitrate. CCE probably just interprets this as a very difficult scene to encode.
In this example, we want our video filesize to be around 3GB.
The reason for this is that the total filesize of our menus, extras, and extracted
AC3 audio is around 1.2GB or so. You want to make sure you stay below 4.37GB.
Keeping my video filesize around 3GB as reported by CCE, resulted in my total
project size being just over 4GB. Now a lot of people ask what the best way
to determine what will fit on a DVD-R and how to tell how much space they have
already used. The best way to do this is to work from the basic measurement
the "byte". It also makes it easier to adjust your settings in CCE to fill the
disk.
 The reason you see 4.7GB on the cover
is a marketing thing. It's 4.37GB but it is 4,700,000,000 bytes. Enter this
into your Windows calculator and work back from there. Checking the properties
of all files but the main VOB's for the movie, we see that there is 1,096,370,176
bytes. Subtract this from your available space. You now see that we are at
3,603,629,824 bytes. Next, you want to check the size of the audio stream
you extracted. We see that it is 384,485,376 bytes. Subtract this from your
current total and you see that we are down to 3,219,144,448 bytes available.
Now the part that is less precise is the subtitles. In my experience, I've
found that they end up being compressed approximately 50% from the size they
show up as on your hard drive. I don't remember what they were for "Double
Jeopardy" but let's assume we see 150,900,736 bytes for the size of the sub
BMP's on the hard drive. Divide this by 2 and you have 75,450,368 bytes. Just
to give yourself some breathing room, let's subtract 80,000,000 from our current
total.
The reason you see 4.7GB on the cover
is a marketing thing. It's 4.37GB but it is 4,700,000,000 bytes. Enter this
into your Windows calculator and work back from there. Checking the properties
of all files but the main VOB's for the movie, we see that there is 1,096,370,176
bytes. Subtract this from your available space. You now see that we are at
3,603,629,824 bytes. Next, you want to check the size of the audio stream
you extracted. We see that it is 384,485,376 bytes. Subtract this from your
current total and you see that we are down to 3,219,144,448 bytes available.
Now the part that is less precise is the subtitles. In my experience, I've
found that they end up being compressed approximately 50% from the size they
show up as on your hard drive. I don't remember what they were for "Double
Jeopardy" but let's assume we see 150,900,736 bytes for the size of the sub
BMP's on the hard drive. Divide this by 2 and you have 75,450,368 bytes. Just
to give yourself some breathing room, let's subtract 80,000,000 from our current
total.
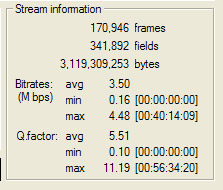
We now have
a total of 3,143,694,080 bytes available. You can now run CCE up to this number
for your video! Don't forget to leave yourself a little room if you're putting
a jacket picture in! (See Authoring section below). I like to play it safe and
leave myself a little "breathing room" on the disc, but you can be fairly certain
that this is the amount of space you have left for the video file you're about
to encode. (Note: I don't have the Double Jeopardy files for the screenshot
so this CCE screenshot is just an example of how to gauge your space in bytes.)
Almost there!
Next, you will need to perform a “pulldown” on the resulting video
file. I found it easiest just to drop the “pulldown.exe” file into my “Windows”
directory since there is already a system path to it. This way, you can access
the command from any directory prompt. You will need to create two files. I
will explain later why. First, use the following command line:
Pulldown project.mpv output.m2v
–prog_frames p
then use this one…
Pulldown
project.mpv output-drop.m2v –prog_frames p –drop_frame true
You will now have a “output.m2v” file and a “output-drop.m2v”
file that can be imported into Maestro.
Finally! Authoring!
 This is really just an intermediate step. We’re not worried
about creating a menu, etc. because we just want to reincorporate our project
into the original file structure. Change the default “4:3” setting in Maestro
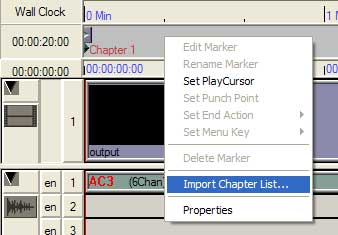
to “16:9 PS/LB”. Import all of your media assets into Maestro. Place the “output.m2v”
video file on the timeline and your audio file. Next, right-click in the chapter
section of the timeline and import your *.CHP chapter list you made earlier.
This is really just an intermediate step. We’re not worried
about creating a menu, etc. because we just want to reincorporate our project
into the original file structure. Change the default “4:3” setting in Maestro
to “16:9 PS/LB”. Import all of your media assets into Maestro. Place the “output.m2v”
video file on the timeline and your audio file. Next, right-click in the chapter
section of the timeline and import your *.CHP chapter list you made earlier.
Once the chapters have been imported, REMOVE the video from the
timeline and replace it with the “output-drop.m2v” file. This will allow for
proper subtitle import. You MUST NOT import the subtitles
when the other video file is on the timeline! They will NEVER be in sync if
you do, even if you replace the file with the “output-drop.m2v” file later.
You MUST place the “output-drop.m2v” file on the timeline BEFORE importing
the subtitles. Right-click on the subtitle line and import your *.SON subtitle
file you created earlier.
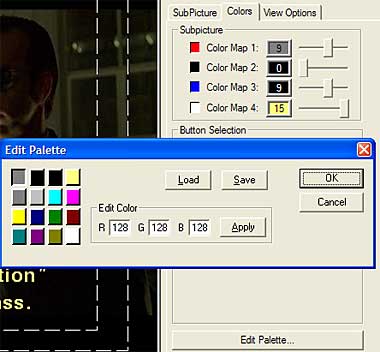 Something you will need to pay special attention to is a
file you may not know about. When you first import your subtitle file and check
them, you will see the colors are not what you set in SubRip. SubRip created
a new pallete file for you to correct this. In Maestro's subtitle editor, click
"Edit Pallete..." then click the "Load" button. You will see an additional file
that SubRip created that is *.spf. Load this up and your colors will be correct
now.
Something you will need to pay special attention to is a
file you may not know about. When you first import your subtitle file and check
them, you will see the colors are not what you set in SubRip. SubRip created
a new pallete file for you to correct this. In Maestro's subtitle editor, click
"Edit Pallete..." then click the "Load" button. You will see an additional file
that SubRip created that is *.spf. Load this up and your colors will be correct
now.
The next part is optional but I always do it anyway. If you go
to the properties of your DVD Maestro project, you will see the option to add
“Jacket” pictures. I always do this to add a little extra to my project. Just
make sure your file is 720x480 and remember that there is going to be some slight
horizontal squeezing on the final TV output. You’ll find something that works.
How the hell do I get it all back
together??
Now is the time for the real magic! The ability to incorporate
your new files back into the original DVD structure so it will be just like
the original with menus and all! The first thing we want to do, in this example,
is rename our authored VOB files to VTS_02 instead of VTS_01. They are going
to replace the VTS_02 files in the original. DO NOT copy
over the authored IFO file! DO NOT copy over the VTS_01_0.VOB file! Remove
all of the original VOB files (You MUST leave the IFO file and the VTS_02_0.VOB
files!) and copy over the new ones in their place.
NOTE! If you do not understand the previous
paragraph as it applies to this example, read it over and over and over again!
If you do not do this right, it will not turn out properly! For those that get
it, please move on. For those that don’t, I urge you to review more material
here on the forum and re-read this tutorial!
 After you have copied over the files, you will want to use
the IFOUpdate utility. Next to IFOEdit, this tool is the best thing since sliced
bread! Thanks Jdobbs! Using it is very straightforward. Enter the full path
(including filename) to the original movie IFO, the newly authored IFO (that
was created my Maestro), and a location and filename for the backup. Click the
“Update IFO” button to update. This corrects all pointers in the IFO such that
your chapters now line up correctly with your scene selection menu! Make sure
you include copying the colors or your subtitles will not show up correctly!
After you have copied over the files, you will want to use
the IFOUpdate utility. Next to IFOEdit, this tool is the best thing since sliced
bread! Thanks Jdobbs! Using it is very straightforward. Enter the full path
(including filename) to the original movie IFO, the newly authored IFO (that
was created my Maestro), and a location and filename for the backup. Click the
“Update IFO” button to update. This corrects all pointers in the IFO such that
your chapters now line up correctly with your scene selection menu! Make sure
you include copying the colors or your subtitles will not show up correctly!
We’re not QUITE done just yet though. As IFOUpdate will remind
you, you need to “Correct VTS Sectors”. Make certain you do not forget this
very important step! As you can see in the screenshot, there is now an option
to enable IFOUpdate to do this for you automatically! Make sure you put your
backup IFO in a safe place in case you need the original again!! I've made the
mistake of getting "button happy" and clicked to fast. I ended up overwriting
my backup with a corrupted IFO. :( Keep your original until you know you don't
need it anymore!
You can now burn these
files to DVD and you will have a DVD-5 that now looks and behaves exactly as
the original DVD-9 did!
I would like to personally thank Jdobbs for all his work on IFOUpdate
and his assistance in the past. I would also like to thank Derrow for his hard
work on IFOEdit and everyone else who created utilities that I listed in this
guide. Last, but not least, I would like to thank Doom9 for providing us with
a wonderful forum where we can share our ideas! Thanks everyone!