Guide to using Photoshop to create DVD menus
As most others have done, I toyed around with the idea of putting my various CD's on DVD and having a menu to access the music. Ultimately, it is more trouble than it is worth. However, I did find it to be a good opportunity to explain to others how they might use Adobe Photoshop in creating their DVD menus. The thing about DVD authoring that makes it so complex to many people is that it forces you to master so many diverse technologies in order to get a final product together just the way you want it. In this guide, I will try to help everyone understand the basics of what you need to understand about Photoshop and subpictures in order to get you started. I hope that this will be more than just a "how to" guide and more of something that will get people thinking independently and creatively about their projects. The more creative and independant thought we have out there, the more knowledge there is to share and go around. Pass it on! :)
I'm new to Photoshop! Where do I begin?
Adobe Photoshop is, hands down, the best photo manipulation software out there! It is the de facto standard for much of the final work done with graphics and art projects done on computer. In this guide, I am using Photoshop 7.0 but since the techniques are simple, you will be able to apply them to other versions of the software as well. The first and more important thing I can tell you to master in Photoshop is LAYERS! There is truly no end to what you can do with layers and it is an absolute must that you learn how they operate and how you can make them work for you.
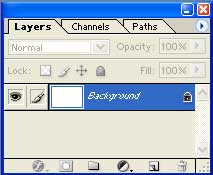
Figure 1

Figure 2
The layers window looks like the image in Figure1. If you do not see it displayed then it probably just means that it got closed somehow. To get it back, click on the "Window" menu item and select "Layers" (Figure 2).
Probably the best way to think of layers is as if they were clear "transparancies". Let's say you had 2 transparancy sheets. One with some words you had written with a red pen. The other is completely black. If you put the completely black one on top of the lettering, you would not see it, right? Conversely, if you put the lettering on top of the completely black one, you would see red lettering on a black background. This is the same way layers work in Photoshop, only they are much more versatile! A feature that is worth mentioning here is the small "eye" icon beside each layer in the "layers" window. If you turn the eye "off" then that layer is not displayed. It doesn't mean it is gone, it is simply not displayed. We'll learn some more about that later.
The next
tool you need to become familiar with is the "Type Tool". It is found
in the main tool section of Photoshop and looks like this: ![]() You can choose horizontal or vertical type by clicking
the button and holding it down to choose which to work with. This is what
you will use to create all of your text. Each text item that you create
will become a new layer in Photoshop. You will see it in the list of layers
shown in the layers window.
You can choose horizontal or vertical type by clicking
the button and holding it down to choose which to work with. This is what
you will use to create all of your text. Each text item that you create
will become a new layer in Photoshop. You will see it in the list of layers
shown in the layers window.
How do I make a new file and get started?
Click on "File...New" and you will see a window to select the attributes of your new file. Since we are making a DVD menu, we want to keep our filesize at a width of 720 pixels and a height of 534 pixels (PAL users will use the settings appropriate to their screensize). The first thing I did was create a couple of layers that would show me the safe title area and safe action area of the screen. You can download this file and use it for yourself if you like. Once you are aware of your area to work with, you can begin working on your menu!
In this example, I am creating a menu to access the various tracks of my "Vanilla Sky" soundtrack. The first thing I did was scan the cover in and add it to my menu. Do whatever you want for the background before working with what will become your buttons. Feel free to use as many layers as you like and be as creative as you want! We're not concerned yet with what will later become our buttons.
Designing the buttons...
Now there are two things you want to keep in mind when you begin creating your buttons (especially if they are text!). First, is do NOT use anti-aliasing. This is a feature which blends text on the screen. It's great for pictures and stuff on the computer but you don't want it for your buttons! It creates areas around the buttons which are difficult to mask and you will end up with a worse result in the end. The next thing is do NOT make your text too small! When I first started working on this idea, I figured I would have a list of all my songs on the screen (Figure 3) and just select which one I wanted to hear.

Figure 3

Figure 4
This turned out to be a bad idea because, while it looked great on the computer, the text was far too small to be displayed properly on the TV. I recommend using a thick font at around 12pt or higher (The bigger, the better!). Although I would have preferred having it all on one screen, I opted for four songs per screen to allow me to use a bigger font. (Figure 4)
Now another thing you will want to become proficient with is arranging your text layers once you have them. How do you line them up? What if I want to move all of my text at one time? There are tricks for doing this in Photoshop. As in my example, I wanted to center each text layer but I also wanted them to align themselves to each other's center point as well. This is done the same way you would move all of the text at one time. You temporarily "link" the layers together in your layer window.
If you are on a particular layer, it puts a paintbrush beside the eye in the layer window indicating that is the active layer to draw on. You'll notice that box is blank for the other layers. Click on this box for each layer that you want linked. It will display what looks like a small chain indicating the layers that are now linked.
Once your
layers are linked, you can control them as one. The first thing you want
to do is center them. This is done by aligning them via their horizontal
centers. (Figure 5) Now those linked layers will all be aligned. You can
also move the linked layers as if they were one while they are in this
linked mode. This is done simply with the "move tool" located on the main
toolbar. It looks like this: ![]() Once you have everything as you want it, go back
and un-link these layers. Also, before you finally save the file, make
sure to toss out the "safe area template" layer. You'll see a trashcan
at the bottom of the layers window that you can drag that layer to. You
can choose to leave it out when you import into ReelDVD but if you do
it here, you are sure not to forget. ;)
Once you have everything as you want it, go back
and un-link these layers. Also, before you finally save the file, make
sure to toss out the "safe area template" layer. You'll see a trashcan
at the bottom of the layers window that you can drag that layer to. You
can choose to leave it out when you import into ReelDVD but if you do
it here, you are sure not to forget. ;)

Figure 5
Now there are two pieces of software that allow the use of your Photoshop (.PSD) files. They are ReelDVD and Scenarist. ReelDVD makes much better use of them and is a lot more user friendly so I will explain from that point of view first.
ReelDVD uses the layers it finds in the Photoshop file to create the submask and, ultimately, the buttons. It does not count the "background" as a layer. It assigns button numbers beginning at 1 and starting with the bottom-most visible layer. To go with our "transparancy" analogy again, whichever is the first layer you lay on top of your background sheet is going to be assigned as button 1 in ReelDVD. In my example, the REM song is the first layer (button 1), the Radiohead song is the next layer up (button 2), and so on. The topmost layer is of the arrow which will become button 5. Save your document in Photoshop (.PSD) format.
Creating the menu and buttons in ReelDVD...
You import the file you just created just as you would any other asset in ReelDVD. When you do this, it will ask you what you want to do. (Figure 6) Since we are wanting to create buttons out of our layers, you should choose "Still menu with subpicture". Afer you click "OK", you will be presented with a screen showing you all of your layers and what the subpicture will look like. You will easily see if you've made a mistake by inspecting everything in this area. Once you are satisfied with the way things look, click the "OK" button and your new menu will be imported.

Figure 6

Figure 7
You are then free to set your "selection color" and "action color" as you see fit in the bottom right window. (Figure 7) My example shows the "selection color" that will be displayed when a button is selected.
Now all you have to do is assign your buttons to something! If you look at the asset on the main storyboard, you will see a small arrow pointing left. When you click on this (it sets the CMD action) and drag it to another asset (a movie, another menu, etc.) then it will pop up a window that looks very much like your main window shown in Figure 7. It will ask you which button is to perform that action. Simply select the button you want, and you're done! Now that was quick and painless, wasn't it? hehe :)
Creating the menu and buttons in Scenarist...
Well, as we all know, it's a sort of "love-hate" relationship with Scenarist. She's really not all that friendly but for all her "bitching", she's still the most powerful out there! ;) There are two different ways you can attack the problem of doing this in Scenarist. The first involves creating the menu in ReelDVD as we've just explained.
Once you've done that, there is an option in ReelDVD to save your current project as a Scenarist script! Open Scenarist and choose the "New from script..." button. Select the script you just saved and assign yourself a new Scenarist filename at the bottom. Click "OK" and your new Scenarist file is created! In fact, it's SO damned easy and convenient this way, I almost don't even want to bother telling you the way to do it from scratch in Scenarist.
Ok, now that you know the easy way, it's on to the hard way. Let me just say again, you really want the easy way! hehe ;) Ok, it all starts way back during the Photoshop work that you did. Ya know, now that I think about it, I'm tired of typing and it's like a whole other section explaining masks and subpictures and button creation in Photoshop and Scenarist. I'm going to post this as-is and if there turns out to be a need past using ReelDVD to create a script as I've described then I will continue this document. I hope that, in it's present form, it has helped assist with menu creation.