Robot4Rip First Time setup
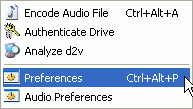
When you first start up r4r you go directly to the configuration screen. Select Tools - Preferences to get there.
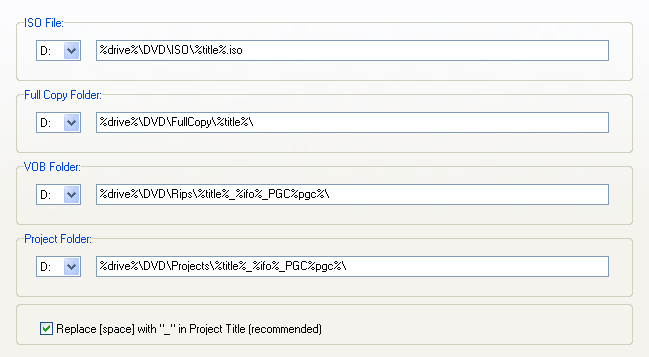
The first option to be set concerns the place where your ripped files will be placed.
 It
is possible to rip to an ISO image, or VOB files. After selecting a drive for
each of the 3 file types you can also manipulate the path if you like. Let's
have a look at the VOB folder to help you understand the syntax:
It
is possible to rip to an ISO image, or VOB files. After selecting a drive for
each of the 3 file types you can also manipulate the path if you like. Let's
have a look at the VOB folder to help you understand the syntax:
%drive%\DVD\Rips\%title%_%ifo%_PGC%pgc%\
%drive% represents the drive letter you selected, so in this case D:. Then we have a path D:\DVD\RIPs\ followed by a complex string combination.
%title% is the disc title (the name you'll see after the drive letter in Windows Explorer), %ifo% indicates the VTS set (or the name of the IFO file without suffix and extension if you like) and last but not least we have %pgc% which stands for the selected PGC.
So, if our disc is named TRAINING_DAY, the IFO file we're parsing for the main movie is VTS_02 and the PGC containing the main movie is PGC 01, then we get the following VOB folder path: D:\DVD\Rips\TRAINING_DAY_VTS_02_PGC1\.
Of course, you are not required to change this and I strongly suggest you only change the drive letter if you feel uncomfortable with these strange strings in any way.
Now, the ISO file folder is where your ISO image of the DVD is going to be copied
(provided you activate this setting later on). Full DVD copy folder is where
every file present on the DVD is being copied (I'll tell you more about ISO
images and full copy in a minute). The VOB folder indicates where the VOB folders
that contain the PGC you're going to process are stored, and the project folder
indicates where project output (DVD2AVI projects, encoded audio files, etc)
are going to be stored.
Now let's proceed to Full Copy / ISO Image.
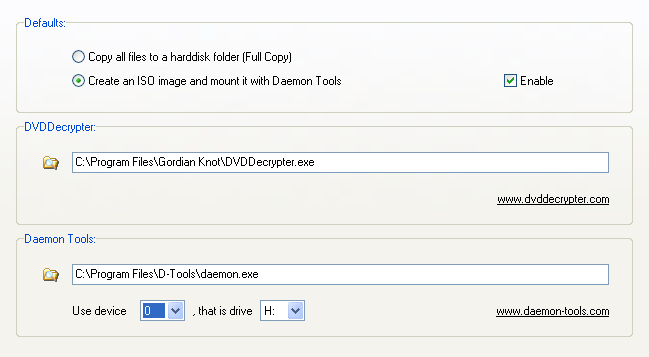 r4r
can rip the entire DVD to an ISO image, or copy the entire DVD to a separate
folder. This has the advantage that regardless of the outcome of your project
you will always have your source files ready for another try and won't be required
to rip the disc again. You'll think "hey, I'm smart enough to not screw
this up so why waste a couple of GBs?", but I assure you that once in your
ripping career you'll end up accidentally deleting something you still need.
r4r
can rip the entire DVD to an ISO image, or copy the entire DVD to a separate
folder. This has the advantage that regardless of the outcome of your project
you will always have your source files ready for another try and won't be required
to rip the disc again. You'll think "hey, I'm smart enough to not screw
this up so why waste a couple of GBs?", but I assure you that once in your
ripping career you'll end up accidentally deleting something you still need.
The ISO image method has the advantage that your ISO file will be protected against accidental deletion as long as it is mounted as a virtual DVD drive.
If the ISO option appeals to you then you should check Enable and then set the path for Daemon Tools as shown by the mouse pointer. Also set the device number (if you have a regular installation of Daemon Tools always set this to 0) and the drive letter your virtual drive has.
Then proceed to the PGC Rip tab.
 You
can essentially skip this tab, as the defaults work out just fine.
You
can essentially skip this tab, as the defaults work out just fine.
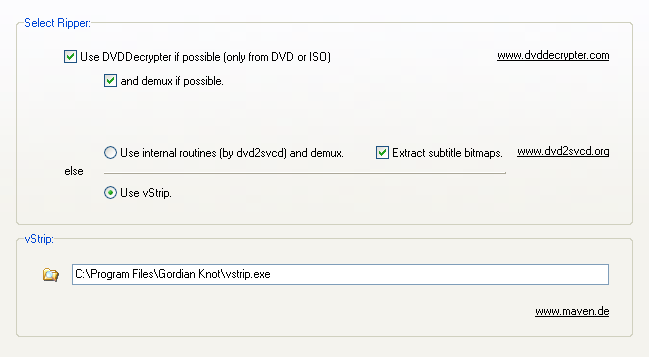
There's one issue about the and demux if possible setting that you should know. When doing subs demuxing will automatically disabled (VobSub can't process demuxed subtitle streams). Also, if you want to run r4r on your ripped files later on (assuming that you're not doing subs) you should uncheck this option since r4r can't use demuxed files as harddisk source for further processing.
Just in case, you can use 3 different ripping programs: DVD Decrypter (default),
the ripping routines of DVD2SVCD or vStrip.
Indexing /Demuxing is next:
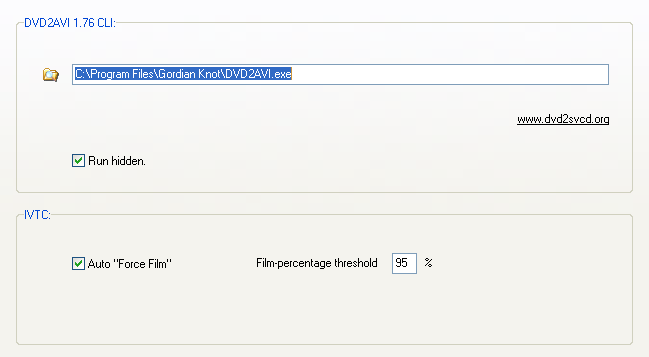 Here
I suggest you set the Film-percentage threshold to 95%. In case you're dealing
with an NTSC movie this will automatically apply force film for better quality.
If force film is not activated you must perform IVTC later on.
Here
I suggest you set the Film-percentage threshold to 95%. In case you're dealing
with an NTSC movie this will automatically apply force film for better quality.
If force film is not activated you must perform IVTC later on.
If run hidden is checked you won't actually see a DVD2AVI window while DVD2AVI is running, but if you like to keep track of the progress you can uncheck it and you'll be able to see the DVD2AVI window including the progress bar.
For PAL users the IVTC options have no influence whatsoever.
Then we have the subtitle options:
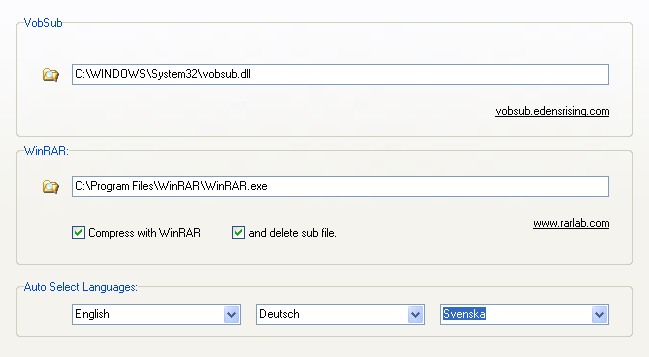 As
you might know, VobSub subtitles can be compressed using WinRAR which saves
a lot of space (a subtitle stream will take a 1MB-ish amount when compressed).
In case you have WinRAR installed you should point r4r to the executable and
activate Compress with WinRAR and delete sub file.
As
you might know, VobSub subtitles can be compressed using WinRAR which saves
a lot of space (a subtitle stream will take a 1MB-ish amount when compressed).
In case you have WinRAR installed you should point r4r to the executable and
activate Compress with WinRAR and delete sub file.
Then we have the language selection. You can predefine 3 subtitle streams that
r4r will automatically rip for you (if they are present). Just select your favorite
subtitle language(s) there and the next time you insert a DVD and start r4r
the correct subtitle streams will be marked for extraction without you having
to do anything.
Then we have the Chapters tab.
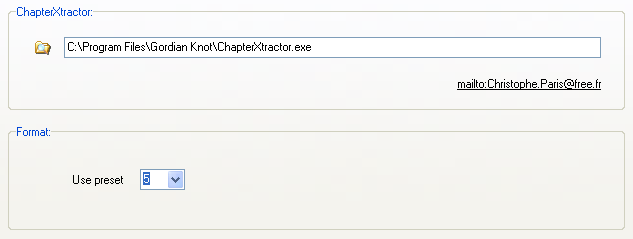 If
you're making OGMs you might like to retain chapter points so this will come
in handy.
If
you're making OGMs you might like to retain chapter points so this will come
in handy.
Normally the OGM chapter format is preset 5 so make sure you select preset
5 and don't touch the presets in ChapterXtractor itself.
The finalize tab is not very interesting for the moment, but it would allow
any application to be run when r4r completes. We hope that in the future somebody
will write an application that takes off where r4r left, that is takes the DVD2AVI
project and audio files, auto crops, performs a comp check to pick the correct
resolution, encodes the video in the desired codec and puts everything together.
But for now just leave that tab as it is and go to the Defaults tab.
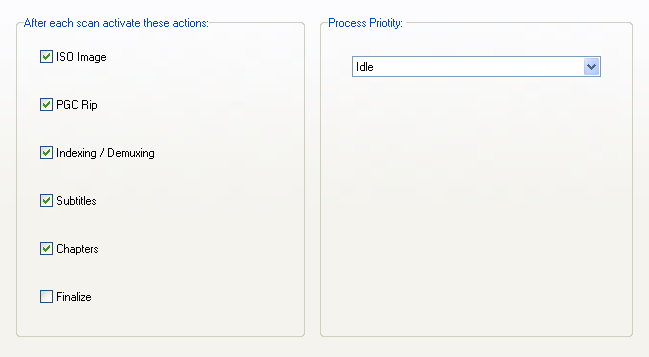 Here
you can select which operations will be performed by default.
Here
you can select which operations will be performed by default.
I like to keep the entire DVD available until a project is finished so I checked ISO Image. PGC rip ensures that the PGC I select is ripped (so only the main movie, without any studio logos and such), Indexing / Demuxing must be checked so a DVD2AVI project file is generated, then I want subtitles so that option is checked as well.
When making OGMs you should also check Chapters so you'll get a file with all the chapter positions.
Last but not least if you're using your PC while r4r is running make sure you
set the process priority to Idle as this won't block your PC.
Now press Save to save those options, then go to the audio preferences which
are also listed in the Tools menu.
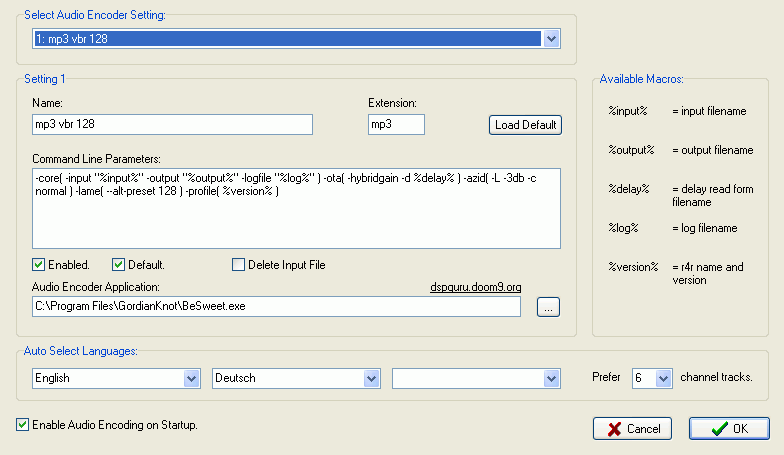 Here you
can define a variety of profiles for your audio encoding needs. The most commonly
used have already been defined, for both MP3 and Ogg Vorbis output.
Here you
can define a variety of profiles for your audio encoding needs. The most commonly
used have already been defined, for both MP3 and Ogg Vorbis output.
If you want to see what commandline is used, or even change a profile, select the appropriate profile from the dropdown list and modify its options in the Setting part of the window. The available macros to the right will help you create a good script but this is really only for experts and the defaults really work very well.
There's just one parameter that can be rather useful, and that's the Default checkbox. Select the profile you want to make the default and check the Default checkbox. From now on, all audio tracks will be encoded using that profile unless you either change the default or assign another profile to an audio stream.
Then we have Auto Select Languages which works the same way as for the subtitles. You select your preferred languages, and if they are present on the DVD they will automatically be encoded without you having to select anything. You can also set your channel preference. In the above example if there's an English 6ch and an English 2ch audio track, the 6ch track will automatically be chosen.
Last but not least make sure that Enable Audio Encoding on Startup is checked if you wish for automatic audio processing. Then press OK.
>> BACK
This document was last updated on November 22, 2003