XviD in VirtualDub
Start up VirtualDub, press Control-O to load the avs file GKnot has created for you.
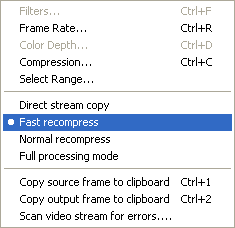
Then set the video mode to Fast recompress by selecting the Video menu and clicking on Fast Recompress.

Then go to the same menu again and select Compression, or simply press Control-C.
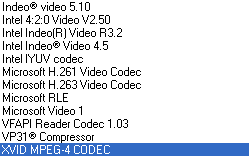 Select the XVID MPEG-4 CODEC from the list of codecs. Then press the
configure button to configure the encoding session.
First of all you get a rather spartanic window:
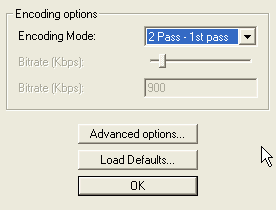 Here
you can select the various encoding modes. In this guide we're going to do a
2 pass encoding so set Encoding mode to 2 pass - 1st pass.
A quick rundown of all the options: 1 Pass - CBR encodes the movie at a constant given bitrate which you can configure.
1 Pass - quality is a constant quality mode. You can set quality to be a number between 0 and 100 where 100 is the highest possible quality.
1 Pass - quantizer is almost the same as quality but here each frame does get the exact same compression, whereas in the mode above the compression can still fluctuate a little (basically it fluctuates between 2 given quantizers).
2 Pass - 1st pass: Analyzation pass for 2 pass encoding. The codec will write a text file containing a suggested bitrate for each frame, which we call bitrate curve.
2 Pass - 2nd pass Int is the internal 2nd pass encoding mechanism. The codec will scale the bitrate curve in accordance with a couple of settings I'm going to explain later.
2 Pass - 2nd pass Ext won't do any scaling but take it from a processed bitrate curve (only GKnot can do that).
Once you've set the codec to do the first pass press the Advanced options button.
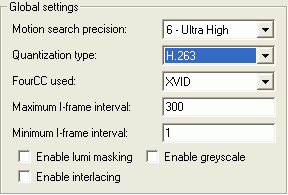 If
you want maximum quality or are going for 1 CD only set Motion search precision
to 6, otherwise to 5. For a 1 CD case set quantization type to H.263 and for
2 CDs to MPEG. H.263 tends to make the picture smoother while MPEG is more crisp.
MPEG Custom is for experts only (if you know what a quantizer matrix does then
by all means use it, but if you're not 110% sure what it does don't touch it).
Modulated will switch between H.263 and MPEG quantizers in order to achieve
a crisper image without increasing the size as much as when using MPEG quantizers
only. If you want to use modulated quantizers you still have to encode the first
pass using H.263 quantizers.
Leave FourCC used at the default of XVID. Changing it would allow you to use the DivX4 or DivX5 playback filter but there still are some incompatibilities so using another setting is not recommended.
Leave the Maximum I-frame interval at 300. This will ensure that you'll get an I-frame (aka Keyframe) at least every 300 frames. If an I-frame is inserted via scene change detection before this number has been reached the counter is reset. Enable interlacing would enable support for interlaced content. This is only useful for truly interlaced content (hardly any DVD is), captured content and video camera stuff.
Then we have lumi-masking which tries to give less bitrate to scenes that the human eye can't see very well. It's still experimental so results may vary from movie to movie but if you are to activate it make sure it's activated in both passes! Enable greyscale enables the mode for black&white movies.
Then go to the Two Pass tab.
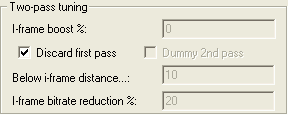 Here
just make sure that Discard first pass is checked. This way the first pass only
creates a stats file. The video created wouldn't be of much use anyway and not
saving it speeds up the process.
Further down in the same tab you can configure the stats file:
 Here
you set the path of your statsfile. The default as shown on the left will write
the stats file to the root of the harddisk where your video source is stored
(for instance d:\).
If you check Hinted ME the motion vectors calculated during the first pass
will be saved to the file given in the Hinted ME line and can be used to speed
up the 2nd pass. There will be a slight drop in quality but you will hardly
be able to notice it.
Next we go to the Credits tab.
 Enter the start and endpoint of your end credits and check Credits at
end of the movie. Normally the 2nd value is the number of frames your movie
has but from time to time there's an additional film scene after the credits
in which case you can use the 2nd parameter to get the codec to switch back
to regular encoding mode so that this scene will be encoded in reasonable quality.
If you have credits at the beginning of the movie you can do the same using
the dialogue for Credits at start of movie.
Finally the encoding mode:
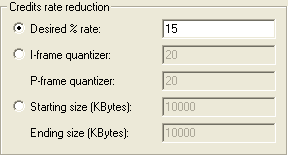 Quantizer mode will
ensure that every frame gets the same quality. If you want to use this mode
you must activate it during the first pass (meaning now). If you prefer to set
a size for the credits or a percentage of the movie bitrate instead you don't
have to do anything for the moment, just make sure the option is set to anything
BUT I-frame quantizer.
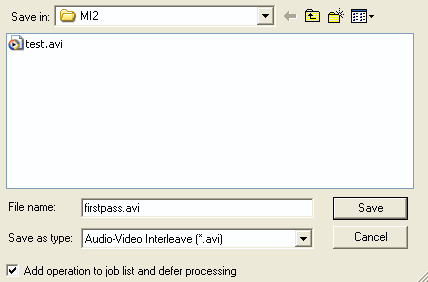
Now press OK 3 times to get back to the main VirtualDub window, then press F7
to save the first pass file. Also check Add operation to job list and defer
processing unless you're going to use GKnot for the curve scaling (not recommended)
in which case you cannot check this option as you will have to perform the first
pass first, then manually process the stats file in GKnot, then set up the 2nd
pass.
Then come back to the codec configuration.
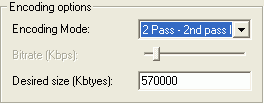 This
time select 2 Pass - 2nd pass Int. from the list. If you prefer to let GKnot
do the scaling select 2 Pass - 2nd pass Ext from the list. You can find more
information about curve scaling in GKnot in the GKnot scaling guide.
But since XviD has many advanced curve scaling features itself it's safe to
use the internal scaling. Go back to GKnot, to the bitrate tab and on the right
size you'll see a Video Size field that indicates how large your AVI without
sound should be, in both MB and KB. Enter the value in KB in the Desired size
(Kbytes field).
Then press the Advanced options button again.
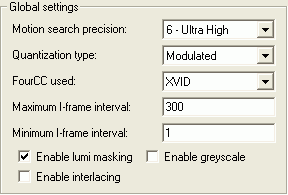 When
going for a 1 CD rip you can activate lumi masking, which is a psychovisual
feature that gives less bits to very bright and very dark areas as the human
eye is not capable of make a good distinction of details in these areas. While
this feature is designed to make the movie look better it has the opposite effect
for some people so use it with care. In any case you should only use it for
1 CD rips.
If you used H.263 quantizers during the first pass you can now use Modulated quantizers to increase crispness. However, you will not be able to use the motion vector file even if you generated it during the first pass, the two features don't mix.
The rest of the options remain unchanged.
Now go to the Quantization tab
 Change the Min I-frame quantizer and Min P-frame quantizer to 2. Using
quantizer 1 is a bad idea anyway so we want to make sure that it is never used.
You can also reduce the max quantizer for better quality but that could result
in the loss of accurate bitrate prediction so use it with care.
Normally you'd play it safe and leave the Max quantizers at 31.
If you are getting nasty looking keyframes (I talked to some of the developers, they tend to think that it's the codec's job to make a good selection so use these options with care) you can try to lower the Max I-frame quantizer to something between 4 and 7. However, I never felt the need for that, I don't recall any shitty looking I-frames in my XviD encodes.
As you can see there's 2 not yet used fields but B frames are definitely on
their way, along with other MPEG-4 features that you may know from DivX5 ;)
Then we go to the Two Pass tab:
 I-frame
boost can be used to give an I-frame more bits than calculated in the bitrate
curve.
Below i-frame distance indicates the distance two I-frames can have to be considered as consecutive. All frames below that threshold will incur a bitrate reduction, the higher the distance the lower the reduction - the reduction depends on I-frame bitrate reduction %. Discard first pass should always be checked, otherwise a video is written even during the first pass.
Curve compression controls how the bitrate curve is being scaled. High bitrate scene % indicates how many bits are "shaved off" high motion scenes, and Low bitrate scenes % is the same for low motion scenes. Bitrate payback delay is how many frames the codec has to react to over/underuse of bits. Leave these options at the default values as shown on the left unless you're sure you understand perfectly well what they're doing and are willing to experiment. Using 0/0 results in a perfectly linear distribution.
Also leave the payback option as it is by default (with bias).
If you use the alternative curve compression as described later in the guide you can obtain better results and the Curve compression values as shown on the left will not be used.
Finally you have to select the first pass stats file to the same value as you
set it when setting up the first pass. When using GKnot to scale the curve the
2nd pass stats field would be active and you'd be selecting the stats file GKnot
created for you. Do NOT use Hinted ME for now.
Now go to the Alt. Curve tab. Before you start here: It's very hard to control
and will more often than not return results which are inferior to using the
regular curve compression so use it with extreme caution and only if you know
exactly what you're doing (note that in the screenshot it's activated so that
you can better see the options).
 Curve aggression defines how quickly the codec
adapts bitrate to frames. A high aggression will help the codec aid low bitrate
frames while hurting high bitrate frames and is better for very dynamic scenes
(i.e. a slow motion scene, then up to a lot of motion very quickly). Low aggression
adapts slower and won't improve low bitrate frames as much, but will not harm
high bitrate frames much either. Medium aggression is a compromise of the two.
Lowering the low distance will move the preference towards low bitrate frames.
Raising the high distance will move the preference towards high bitrate frames.
(So far, the XviD forum tests point to a low distance below 100 and a high distance
between 150 and 250)
Strength specifies how much of a calculated variation is allowed. Strength has
a big influence on the quality but the default of 50 has been shown to produce
very good quality throughout a whole film.
Bonus bias is the percentage of the bonus that is distributed in a bias manner
and the rest in a proportional manner. Basically, the higher the bonus bias,
the more preference to low bitrate scenes.
Last but not least go to the Credits tab.
 If you decided not
to use quantizer mode you can either set a percentage of the final bitrate or
a certain size by selecting either Desired % rate and enter a value (use 10-20%),
or selecting Starting size (KBytes) and enter the desired size for start and
end credits. If you have no start credits just enter 0 in that field.
If you used quantizer mode in the first pass you don't have to change anything
here.
Then press OK 3 times again, then press F7 to save the AVI, give it another
name as for the first pass and also check Add operation to job list and defer
processing. Then press F4 to bring up the joblist.
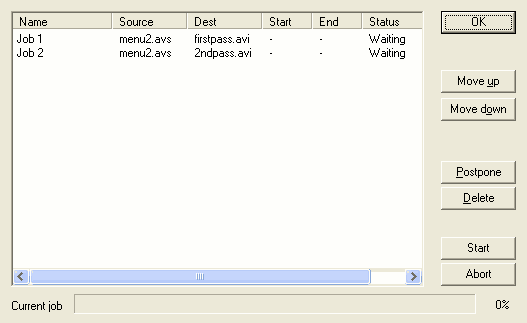
All you have to do now is press Start and both passes will be performed after each other without requiring any manual actions from your part. Once the encoding process has finished you can now close both VirtualDub and GKnot.
>> BACK
This document was last updated on 27/12/02