4.2 Capturing using VirtualVCR
If you own a capture card that is based on WDM (=Windows Driver Model)
drivers, problems when capturing with VirtualDub occur frequently. There
are several capture programs that utilize WDM though, and one of them is
VirtualVCR, which has some unique features, one of them and probably one
of the most important is that it is freeware.
Configuration
After starting VirtualVCR you'll first get this sparse window:
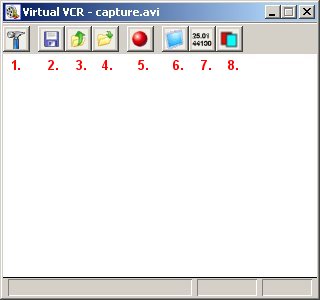
The toolbar includes the following options:
-
Opens the settings dialog.
-
Saves the current settings as the standard profile.
-
Opens another profile.
-
Saves the current settings to a new profile.
-
Starts the capture process.
-
Activates the preview.
-
Opens the statistics window.
-
Displays a list of dropped frames.
Now click on the first symbol to open the settings dialog. It is recommended
to the adjust the settings in the following order:

-
Path and filename of the capture file.
-
If you check this checkbox a time stamp is automatically inserted into
the filename. Recommended to prevent the overwriting of files!
-
Adds a compatibility index to the avi file; only needed for old applications.
-
If you check this box a log file is created containing the most important
statistics of the process like dropped frames, etc.
With the stop option you can set conditions that tell VirtualVCR when to
stop the capture process:

-
Here you can specify a max duration of the capture process.
-
Quite self explanatory. VirtualVCR automatically quits after the capture
process stops.
-
Set a threshold for minimum free space.
-
Minimum free space in MB.
In order to not have to specify these settings every time you can start
VirtualVCR with special parameters!
The next important tab is 'Devices':

Here we first choose our Audio and Video capture device and then hit
'Select'. Due to a bug in VirtualVCR those settings aren't taken into account
immediately. Therefore we close the settings dialog box by hitting 'Ok'
and then immediately reopen it again.
In Video source we specify the appropriate input (Video Tuner, Composite
or S-Video).
In Device Settings we now choose 'Video Capture Pin' and hit 'Prop'.
This opens the settings dialog for your capture card, which is similar
as this one:

-
Frames per Second.
-
Colorspace. If YUV2 doesn't work, try other settings. This depends on the
hardware you are using.
-
The resolution, for PAL 7** x 576, for NTSC 7** x 480. It is recommended
that you choose the largest resolution.
If your card supports hardware based preview, you can now choose Video
Preview Pin in the Device Settings and adjust the settings to your preference
there. My card theoretically supports hardware preview, but effectively
it doesn't work as expected. Anyway in this case you can always use Smart
Tee Filter for the job. More on that later on.
Next tab is 'Audio':
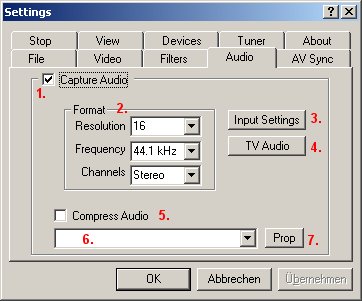
-
If you also want to capture audio (who doesn't?), tick the checkbox!
-
In the 'Format' area you can choose Resolution, Frequency and the amount
of channels.
-
After clicking 'Input Settings' you can choose the input type (e.g. Line-In)
-
Under 'TV audio' you can adjust special audio settings for direct TV capture.
Some transmissions can contain more than one audio channel or special commentary
for visually-disabled persons.
-
If you want to compress the audio while capturing you have to check 'Compress
Audio' (not recommended)
-
Choose the audio codec if compression is switched on.
-
Settings for the audio codec.
In most cases you capture audio and video streams utilize different hardware
(e.g. TV-card for video, sound card for audio). These cards might work
with different system frequencies and therefore sync issues can arise during
the capture process. VirtualVCR has a feature that almost no other capture
application has: it can resample the audio stream dynamically. To do so
the time difference between audio and video is calculated and then the
audio is resampled to keep the whole thing synced. In the 'AV Sync'-tab
you can adjust these settings:

-
Here you can enable/disable this function.
-
Here you can toggle the dynamic resampling.
-
If the difference between audio and video frequency is constant you should
choose this option.
-
The relative difference between audio and video frequency.
-
If the offset between audio and video is constant you can sync audio and
video here.
-
Sync the audio using the DirectShow-Interface values.
-
Manual syncing.
-
Video - Audio offset in milliseconds.
-
If one of the streams should 'act' as a Master Stream enable this option.
(Only possible if Resample Audio (1.) is disabled).
-
Enable the logging of the offset values. This file can get fairly big,
therefore it's only recommended for testing purposes (short clips).
Next you have to adjust the tuner settings. If you are capturing from another
video source you can skip this step:

When opened the Tuner- dialog is empty, but we are going to make the
TV Tuner device search for channels in a minute. First we have to set the
country code and the input type though. Therefore we hit the button TV
Tuner Device. The following dialog box opens:

-
Here you can set the country code, for germany it is 49.
-
The input signal of your Tv-card.
-
Tuner mode: TV.
-
PAL, NTSC or Secam.
If you are done with the settings hit 'Ok' to get back to VirtualVCR. Now
hit the button 'Scan'. After the alert that the scan-process will overwrite
all prior settings the following dialog box will appear:

Activating 'Aggressive Channel Scan' will result in more channels being
found, including those with a weaker signal. If you want to use those channels
you can decide later on, therefore I'd recommend activating the checkbox.
After the scan is done a list with all channels will pop up:

I recommend that you also name the channels appropriately! To do so,
just choose the channel in question and enter the name in the 'Name' field.
Afterwards you have to hit 'Update' or the new name will not be saved!
This work is rather straining, but don't worry, you'll only have to
do it once! After everything is done, we are going to close the dialog
box by hitting 'OK' and then saving our Settings as the default ones. You
can do this by hitting the button with the 'Floppy' - symbol in the main
window of VirtualVCR.
VirtualVCR can already apply filters during the capture process, which
is not recommended though. It is way better to capture the unfiltered movie
first and then do some post-processing in VirtualDub or AviSynth. For completeness
sake I'm going to explain the filters tab too:

-
Activate filtering during the capture process.
-
In this list in the beginning only filters are shown which have been installed
with VirtualVCR.
-
To show all Direct-Show filters, you have to check this box. It will add
all available filters to the list (2).
-
By hitting the 'ADD' button you can add a previously selected filter to
the process!
-
This list shows all activated filters. The filters are applied in the shown
order.
-
By hitting one of these buttons you can (re)move the filters or change
their properties!
Remember to again save your settings as standard settings if you desire
to do so!
Now we can first try to start the preview window. To do so we are going
to hit the monitor-symbol (# 6) in the main window . If you do not see
a picture now, VirtualVCR can't handle the Preview-Pin of you card. In
this case Smart Tee Filter helps.
Attention! Always close the preview window before changing settings
in VirtualVCR!
To activate the Preview mode go to the settings dialog again and navigate
to the View tab.

-
Use Smart Tee Filter for Preview
The Smart Tee Filter parts the Capture-Signal into a capture-stream
and a preview-stream.This should always be activated if VirtualVCR cannot
handle the preview pin right or it doesn't work correctly.
-
Dock Capture Stats Window
As it says, this docks the capture statistics window to the main window
of VirtualVCR
-
Show Capture Stats on Stop
...
-
Show Color Histogram
displays a color histogram during the capture process
-
Show Audio Scope
By looking at the audio scope (during capture, or testing) you can
find out the fitting audio settings.
-
Always on Top
...
-
Hide Tool/Status Bar
...
After hitting 'OK' again and showing the preview you should hopefully see
the picture in the appropriate resolution:

If everything worked fine it's once again time to save our settings
as standard settings.
The Capture
If all settings are correct and Audio and Video sound/look ok, it's
time to finally proceed to the actual capture process!
Manual Capture
With a simple click onto the capture button (# 5) VirtualVCR starts
the capture process. You can always see the current status in the statistics
window, which you can activate by hitting the stats button (# 7)
During capture the toolbar is reduced to these three buttons. The very
left one stops the capture:

Manual capture with time limit:
If you cannot be here (or do not want to have to watch the time) you
can set a specific time period after which VirtualVCR stops the process
automatically. The setting can be found in the 'Stop' tab of the settings
dialog.
Timer-based capture
This is not a built in function but a separate freeware program. You
can find the download link at the end of this page. VirtualVCR Scheduler
starts and stops the capture process at a time you specify in advance.
VirtualVCR Hotkeys
VirtualVCR can be accessed by a number of Hotkeys:
| Key |
Function |
| F5 |
start capture process |
| Esc |
stop capture process |
| P |
toggle Preview |
| S |
toggle Stats window |
| F |
toggle fullscreen mode |
| H |
toggle tool and statusbar |
| T |
toggle 'Always on top' |
| C |
calls the settings dialog |
| Page Up |
Next higher channel |
| Page Down |
Next lower channel |
Commandline parameters for VirtualVCR
You can also call and set VirtualVCR via commandline:
| Parameter |
Function |
| -capture |
immediately start capturing after start |
| -channel "X" |
channel number |
| -profile "configfile" |
Choose another configuration than the default one. "configfile" must
be with a full local path (c:\yourdir\yourconfig). |
| -runfor "seconds" |
length of the capture in seconds |
| -output "capturefile" |
name for the output file. |
References:
VirtualVCR: www.digtv.ws
VirtualVCR Scheduler: www.zisoft.de/video
Next: Postprocessing: using VirtualDub
or using Gordianknot or using
AviSynth
Back to the Index: <HOME>
Last edited on: 09/11/2003 | First release:
05/07/2002 | Author: zisoft | Translator: killingspree