Gordian Knot
Gordian Knot contains facilities to do pretty much anything you need in terms of video encoding.
Table of content:
1: Select a project save slot
2: Rip the DVD
3: Create a DVD2AVI project
4: Find the right bitrate
5: Select a resolution
6: Subtitles (optional)
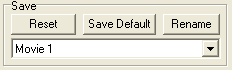
Step 1: Select a project save slot
Start up Gordian Knot, select a free slot in the dropdown list at the bottom right of the window, click rename to give it a good name and all your settings will be saved in this slot and can be reused later on.
In the ripping tab press the SmartRipper button to start Smartripper. Then press the Target button (that's the small folder button at the bottom) and select a directory where you have enough space left. Then press the Start button and wait until the process is finished. Ripping can take anywhere from 15 to 60 minutes depending on the speed of your drive.
If you like more information on SmartRipper please refer to the SmartRipper guide.
If SmartRipper should not work you can start vStrip by pressing the vStrip button und use this program to rip. vStrip is not very straightforward so you may find the vStrip guide useful.
Step 3: Create a DVD2AVI project.
Press the DVD2AVI button in the ripping tab to start DVD2AVI. Then create a DVD2AVI project.
After you're done close DVD2AVI and come back to GKnot.
Step 4: Find the right bitrate
In GKnot go to the bitrate tab.
Load the DVD2AVI project file (.d2v) by clicking on the Open button and selecting the .d2v file you've created before.
 If you
did not choose Force Film in DVD2AVI due to a too low film content you can perform
IVTC during encoding. You'll activate IVTC upon saving the avs file (later on
in the guide) but first you should already set FPS to 23.976 so that the correct
number of frames for the resulting movie will be shown.
If you
did not choose Force Film in DVD2AVI due to a too low film content you can perform
IVTC during encoding. You'll activate IVTC upon saving the avs file (later on
in the guide) but first you should already set FPS to 23.976 so that the correct
number of frames for the resulting movie will be shown.
GKnot automatically reads the number of frames and the framerate from the .d2v file. Selecting your DVD2AVI project file will open another window where you can see the video. Put that window in the background but do not close it.
Then let's pick the right codec. If you use DivX4, DivX5 or XviD set the codec to DivX4. This option will not actually set the codec you're going to encode to use the movie, but it is required for a correct bitrate calculation because DivX3 takes 1 kilobyte = 1024 bytes whereas all other codecs take 1 kilobyte = 1000 bytes. If you use DivX3 select Divx 3. In that case the DivX4 logo shown below will be replaced with a DivX3.11alpha logo.

Now set your desired filesize and number of CDs:
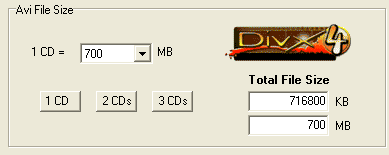 This
is pretty straightforward. Enter the CD size, click on the X CD button or enter
a filesize manually.
This
is pretty straightforward. Enter the CD size, click on the X CD button or enter
a filesize manually.
Then we have the Interleaving and AVI-Overhead options. When you add an audio
track to a movie you will notice that the size of the output is larger than
the sum of both video and audio input. GKnot can take care of this phenomenon
for you so you don't have to worry about getting oversized movies.
 The
default is to create a VBR MP3 in which case you have to select 1x vbr-mp3 as
shown on the left. If you want another type of audio track or multiple tracks
please select the appropriate option instead.
The
default is to create a VBR MP3 in which case you have to select 1x vbr-mp3 as
shown on the left. If you want another type of audio track or multiple tracks
please select the appropriate option instead.
Then let's actually configure the audio tracks themselves..
 Since
we don't have the audio encoded yet we don't know the exact size yet and have
to make a best estimate here. Per default GKnot will create an audio file that
has an average bitrate of 128kbit/s so select Bitrate 128kBit/s from the Audio
A bitrate dropdown list.
Since
we don't have the audio encoded yet we don't know the exact size yet and have
to make a best estimate here. Per default GKnot will create an audio file that
has an average bitrate of 128kbit/s so select Bitrate 128kBit/s from the Audio
A bitrate dropdown list.
If you want a second audio track also enter the same bitrate in the Audio B field.
If you want one or two AC3 tracks just check Size, press the Select button
and select your AC3 file and GKnot will then enter the appropriate size.
Step 5: Select a resolution
Then click on the Resolution tab. The first step is the cropping.
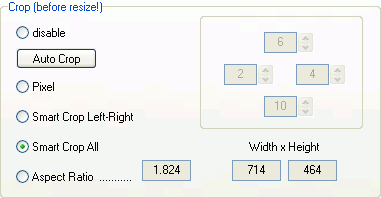 Press the
Auto Crop button (this button is only available when you have loaded the DVD2AVI
project file). GKnot will go through a couple of frames in the preview window
then you'll see the results. If they are about what you'd expect select Smart
Crop will will give you the ideal crop values to minimize the aspect ratio error.
Press the
Auto Crop button (this button is only available when you have loaded the DVD2AVI
project file). GKnot will go through a couple of frames in the preview window
then you'll see the results. If they are about what you'd expect select Smart
Crop will will give you the ideal crop values to minimize the aspect ratio error.
There's another issue here: If you go to the options tab again you will find
the "Follow ITU-R BT.601 Standard" button. As I'm one of the people
who thinks PC resizing is okay (and in fact every of my guides is written to
respect that resizing rather than this ITU standard) I deactivate this option.
Then set the DAR according to what the value you wrote down in the DVD2AVI step.
That is either NTSC anamorphic (16:9) for a 16:9 value in DVD2AVI or NTSC non
anamorphic (4:3) for a 4:3. In case of a PAL source it will of course say PAL
anamorphic (16:9) or PAL non anamorphic (4:3).
 You can go
to the window that shows your video and select resized from the view menu and
check if it truly looks okay. And while you're at it, move the slider to advance
in the movie until the end credits start and press the Set Credits Start button.
You can go
to the window that shows your video and select resized from the view menu and
check if it truly looks okay. And while you're at it, move the slider to advance
in the movie until the end credits start and press the Set Credits Start button.

Now you have to set the resolution by moving the big slider.

You can see the Aspect Ratio error in one of the fields, and as you can see the results are close to perfect. You also have to keep watching the Bits/Pixel values (Output resolution):
![]()
It's a bit guesswork as you cannot predict compressibility of your movie but here's some hints:
Mode the slider until you're within this range. These values are the general rule for DivX3 encoding. I find it safe to go quite a bit lower using another codec, say 10-20% at least.
This step is optional so if you don't want any subtitles you can skip this step.
Last but not least you may want to add subtitles. If so, go to the subtitle tab and press the Configure button.

Then press the Open button and select the ifo file from your movie. You'll then be presented with the following screen:
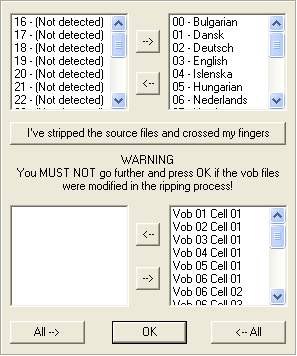 Normally
everything should work fine if you just press OK but if it doesn't press the
"I've stripped the source files and crossed my fingers button". You'll
be asked to provide a directory where to save the indexed files. 2 files will
be created in the directory you've provided: vts_01_0.idx and vts_01_0.sub.
Use Winrar to compress the .sub file to
vts_01_0.rar, then delete the .sub file. You don't have to perform this compression,
however, if you do you can bring down the size of the subtitle file to below
1MB per audio stream which is a considerable gain.
Normally
everything should work fine if you just press OK but if it doesn't press the
"I've stripped the source files and crossed my fingers button". You'll
be asked to provide a directory where to save the indexed files. 2 files will
be created in the directory you've provided: vts_01_0.idx and vts_01_0.sub.
Use Winrar to compress the .sub file to
vts_01_0.rar, then delete the .sub file. You don't have to perform this compression,
however, if you do you can bring down the size of the subtitle file to below
1MB per audio stream which is a considerable gain.
BTW: the filenames will differ according to the name of the .ifo file you load,
in this case I loaded vts_01_0.ifo so all files will be called vts_01_0.*. Also,
if you use an older VobSub version like the one that comes with GKnot 0.21 the
.ifo file will also be required.
Upon completion of the process you can position the subtitles and change the
color combination in the window that you've seen before. Once you're done press
OK. Note: GKnot also gives easy access to the subtitle synching tool that comes
with VobSub and the subtitle file cutter so if you should need either of them
it's easiest to launch them directly out of GKnot at a later point.
If you want subtitles permanently inserted in the picture that's it and you can go to the next step. If you prefer to have subtitles that you can turn on and off during the movie you must add them to the bitrate calculator so that GKnot will not create a movie that is too large if you to fit on your CDs.
 Use
the add button to add your 2 subtitle files so that you'll have enough space
to store them onto your CD(s) after the movie has been encoded.
Use
the add button to add your 2 subtitle files so that you'll have enough space
to store them onto your CD(s) after the movie has been encoded.
>> BACK