
Button Over Video in the Matrix with Scenarist by SeYtoN
This guide should enable you to recreate the extra features found on some very complex DVDs like The Matrix. Before reading this guide I suggest you read and completely understand the IfoEdit-CCE method and OxP's seamless branching guide. After that you should rent or buy The Matrix DVD with the white rabbit extras and have a good look at them. After the initial shock of 37 PGCs has set in you will realize that there are indeed 9 buttons over video in VTS2 PGC6 I am only using the Matrix (PAL region 2 normal edition) because it is a very famous example. There are other DVDs out there that also use Buttons Over Video and this method should work for them as well. I would also like to note that when I refer to OxP's guide about seamless branching, I am talking about DVDs with more than one version of the film on them.
You will need the following software for this guide
IfoEdit
Imgtool(put that in the IfoEdit
directory)
IfoUpdate
ScenChap
SubRip
ChapterXtractor
Scenarist
Table of content
1: Preparation/Analyzing
2: Encoding
3: Tracks in Scenarist
4: White Rabbit subs
5: Scenario Editor in Scenarist
6: White Rabbit Buttons
7: Merge the Scenarist files into your project
To even start this project you have to know the entire structure of the DVD and be able to quote it or else you will just get lost. Now you have to thank Warner Bros for making such a nice DVD. If you load it up in PowerDVD you will find that none of the titles are in the same order as the PGCs on the dvd which makes life slightly harder as you have to find out what PGCs are what. So, a look at VTS1 shows that PGCs 1-9 are the white rabbit extras and PGC10 is another extra feature with PGC11 as a dupe/dummy track of PGC10 just to make life harder for us. VTS2 is a nightmare. PGCs 1,6,13,14,15 are all the main film with the same time length and have the same cell structure, but PGC6 uses seamless branching as it contains the linking scenes for the white rabbit. There are a few dummy PGCs in VTS2 which contain cell commands for the linking to work across the VMG The rest of VTS2 are just small video clips. VTS3 is also strange with some extras duped for no obvious reason.
If you open up VTS2 in IfoEdit you will see the use of seamless branching. PGC6 has different VOB IDs just for the white rabbit parts. However realistically this is not needed because the white rabbit is a substream that is stored in all the PGCs. So if you play sub 0x85 in PGC1 then you will see a white rabbit pop up in the same place. Maybe the original author intended to do something different here or encode it directly to the video? You can start to relax because you know that full on seamless branching is not needed as it is just an added extra part for no reason other than to make this dvd hard to copy and because there is only 1 version of the film on the DVD. However, if you read the pre and post commands you will see that the white rabbit is controlled by lots of GPRM values that link to cells. So, when you encode the film you will have to create 99 chapter points for the 99 cells instead of 38 chapters, otherwise the linking will not work. The cell structure must be identical for this to work. If you want to be adventurous and get an exact replica then you can follow OxP's guide and rip it seamlessly with separate VOB IDs but it is not really needed for the Matrix. Of course, if you are ripping another DVD that uses buttons over video and has more than 1 version of the film on it, then you will need to rip it seamlessly.
The main problem now that we have is that the main film is in VTS2 and the white rabbit extras are in VTS1. This is because the white rabbit extras are taken from a TV film that was broadcast detailing the making of the Matrix. This was then telecined and you now have an average quality interlaced film for VTS1 with 2 channel AC3 tracks. If the original author had made these 16:9 instead of 4:3 and included it in VTS2 then life would be much easier. Then you could just link straight away to the PGCs in VTS2 with a button and everything would work. But, because it is in VTS1, we have to create links that we are guessing are correct which will go through the VMG and link to the PGCs in VTS1. There is a quick solution that I attempted at first. You can bicubic resize and either crop or add black borders to the 4:3 white rabbit videos and convert them to 16:9. You will also have to convert the audio tracks to the correct bitrate and channel numbers using BeSweet and Scenarist's AC3 encoder. Then you can squeeze these 9 PGCs into PGCs 13,14,15 or to the dummy PGCs as these PGCs are never actually played in the movie and are just there to make life harder for us. Then you can simply link to the PGC in the same VTS and link back with a cell command. (N.B. IfoUpdate will remove all the pre/cell/post commands you add that aren't in the original, so you will need to go into IfoEdit and add the cell command manually under the VTS_PGCITI section for this to work. The other method for this, if cell commands don't work, is to experiment with invisible buttons that have forced actions so they always run even if the user does not click on them. As button commands are stored in VOBs then IfoUpdate will not remove them. This will also work in any situation so is a very handy tool to master). But by doing this you will now have the white rabbit extras either cropped or with black borders so some people may complain, and you will have also have created a completely new DVD structure. However, doing it this way will work and may be easier for some but we want our finished project to be identical to the original.
When you first look at the cell structure and VOB IDs of the matrix you will see that it uses a form of seamless branching. However PGCs 1, 6, 13, 14 and 15 are identical in length. The only difference is the VOB IDs for the white rabbit extras. The cell structures are identical. Therefore we can assume that it does not use seamless branching for 2 versions of films like in OxP's guide. This makes life easier as we know that we only have to rip the whole movie instead of separate VOB IDs like in OxP's guide which will produce just one M2V file for the main film instead of a M2V file for each VOB ID. So after all this analysis of the DVD you can now start the tedious process of ripping. As this is an expert guide I won't bother to explain how to rip a DVD. Just rip all the PGCs in DVD Decrypter, but don't bother ripping PGCs more than once that are identical because they have been duped. So, for example, only rip VTS2 PGC1 instead of doing PGC6,13,14 and 15 as well. Then encode in CCE and rip audio and subs like normal. When you rip the white rabbit substream 0x85 you might want to manually edit the pictures to make the white rabbit black instead of red so that it will look white instead of black in the final project. Also remember to look at the DVD and work out the selection/action colors for the white rabbit buttons so you know what to set them to in Scenarist.
Add the assets like normal in Scenarist and make the tracks for the PGCs (don't dupe tracks if they are identical like the PGCs). When we create chapter points in Scenarist, we will have to create chapters for every cell points. Which means we will end up with 99 chapters/cells in each of the main film PGCs. This is done by adding all the assets to Scenarist and then exporting the script. Then use ScenChap and ChapterXtractor and load up the VTS2 IFO. PGCs 1, 6, 13 and 14 all have 38 chapter points, but PGC 15 has 99 chapter points (one chapter for each cell). This makes life a lot easier, as if we did not have the cell points then we would have to work them out manually using IfoEdit or a different program. So, just use the normal method to add 99 chapters to the main film track. Then import the script and have a look at the tracks. The main film should now have 99 chapters representing each cell point.
We know that the white rabbit buttons are just actually a subpicture over a movie with a highlight layer put on top for the button interaction. So, for buttons over video to work, the subpicture for the button must be in every substream that is present in the track. So first just add all the white rabbit subpictures to each subtitle stream for the main movie PGC leaving the other subtitles behind for now. However, we only want the actual white rabbit graphic to appear in substream 6, so therefore we have to fill substreams 1-5 with blank white subs that have the same timecodes as subpicutre 6. If we only had subs in substream 6 then Scenarist would not be able to make the highlight layer and we wouldn't be able to create buttons over video. If all the substreams had the white rabbit graphic then the white rabbit would also appear in the normal film when you are viewing, for example, English subs. Once they are imported, the main movie track should look something like this: (Here you can also see all the cell points in track view for the white rabbit linking to work)
Note that you do not actually need to name the language of each stream. IfoUpdate will fix this later on. It is much more efficient and easier in Scenarist if you just leave all the streams as 'Not Specified'. Each subpicture must also have forced start selected in its options for a button to be created on top of the subpicture. This means that the subpicture will always appear if substream 6 is selected, even if it is not meant to be playing. To do this go to data view and double click on the bitmap you want to modify. The forced start option should be shown in the data options box like the picture:

Now you can add the other subtitles to the main movie track and other tracks. The main movie track should look something like the picture below. Note that you can clearly see the white rabbit subpicture is in every substream and that it is neatly surrounded by cell points like the original for linking.

Now we have to assign the buttons to each of the subpictures to create a highlight stream. Load up simulation window for the main movie track. Under the track tab make sure that Subpic 6 is selected. Then use the left and right arrow buttons near the top to browse through the subpicture 6 stream. This should take you to the white rabbit subpictures only. Get to the first one and drag a button over the white rabbit as show below. Do this for each white rabbit (9 in total). You should now have 9 blocks in the highlight stream and 9 buttons. The relevant parts are highlighted below:

Step 5: Scenario Editor in Scenarist
Create the correct number of VTS's and titles in scenario editor in Scenarist. Add the tracks to VTS 1 and remember that PGCs 10 and 11 are duped. Now comes the hard, long, tedious part. Load up the VTS2 IFO in IfoEdit and look at the main film PGC's cell and chapter structure in the main window. This must be recreated in Scenarist in the same structure. You will also notice that the first cell does not start at 00:00:00;00. Why? I don't know exactly. Either its more IFO protection or the original author messed up. Either way, it should not affect the authored VOBs. So, in scenario editor change the view in the bottom right data window so that you can see the cells from the main movie PGC. Then drag the first cell of the film PGC to title 1. This will create a new PGC, program and cell. Then drag cell 2 to the same program. Do the same up to cell 2. Then for cell 7 drag that to the PGC. Then drag cell 8 to cell 7's program box. And so on... As you can see, each program box is a chapter. So, once you have dragged 99 cells over you should end up with 38 program boxes representing 38 chapters points and 99 cell points in that PGC. A section of the start is shown below:

You can also see in this screenshot the first white rabbit button below cell 5. Next add the other tracks to the other titles. PGCs 3-5 and 16-18 need a dummy track so just drag a slide show to them. When you get to PGCs 6 and 13-15 just right click on the PGC box in title 1. copy and paste to the other titles. You will have to wait a few seconds/minutes for it to copy over the information. Also be warned that the more cells you add the longer Scenarist will take to perform its operations so be patient or else you will crash it and end up with a corrupt .scn file. Once all the titles are completed you now have completed all the movie parts of the film. All that is left now is to get the white rabbit linking working.
By now you should have a clearer understanding of how buttons over video work. So you should realize that if the PGC the button linked to was in the same VTS then this step would be very easy. You would just have to tell the button to link straight to that PGC and the rest of the dvd IFO structure should return us back to the film in the correct place after the extra has finished. If you are unlucky then there might be some IFO protection and you would have to change a GPRM value to stop this, or you might have to NOP an IFO command to skip this protection. However, The Matrix's white rabbit buttons link across the VTS. This makes life near impossible. We can't just tell the button to link straight to the PGC in the other VTS because we would have to go through the VMG. To do this would mean we would have to rebuild the whole menu, which would be near impossible. Therefore we have to work out what the original command would have been and use this instead. There are two methods to doing this. The first is very tedious and will take a long time: load up the VOBs in Vobedit and search through all the hex to find the command for the button. We have to do this because button commands are stored in VOBs and not the IFOs The other method is to use our brains to guess what the command should be. As this will be different for every DVD you can't just use the same commands I will use here for The Matrix. Therefore we have to look at the pre/cell/post commands for PGC 6 in IfoEdit. The post commands are shown below:

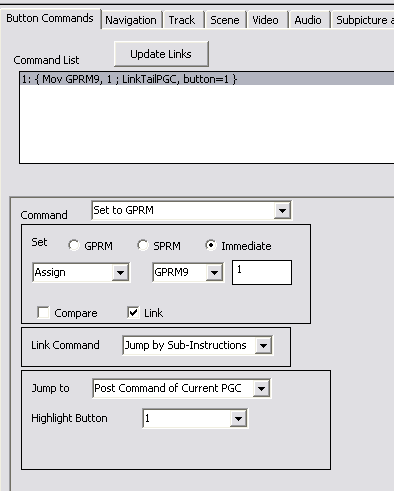
Here we can see 9 checks and VMG PGC calls in the post commands. Coincidence of 9 white rabbit buttons? If you look at the pre commands you will also see a group of 9 commands. So now we can deduce that the white rabbit linking uses GPRM values to know where to link to. Another thing that is interesting is why there would be all these commands for the post commands. When the film finishes it would normally go straight back to the menu, so would only need a few post commands for that. But here we have many. Which means that the white rabbit buttons most probably call the post commands of that PGC. Therefore, we can assume, that when you click on a white rabbit button, it changes the value of GPRM 9 and then runs the post commands for the PGC it is in. This then links to the VMG depending on the value of the GPRM 9 register and plays the white rabbit extra from VTS1. When that is done, it then links back to the VMG and back to VTS 2 PGC 6 where it runs the pre commands to see where it should go back into the film. All that is left now is to make an educated guess at what the GPRM 9 register should be set to. Its clearly obvious that it is from 1 - 9 for each white rabbit button. So, the command for the first white rabbit button would be : Mov GPRM9, 1 ; LinkTailPGC, button = 1. I also found the command using Vobedit: Set GPreg<9> mov (set-val)<1>(Link subset) LinkTailPGC. As we can see, the commands are identical. So we now know that the linking should work. To setup a button command, just double click on the Btns tab on each button. Below is an example of what the button screen should look like:
Once this is done you can add all the other PGC tracks to the VTS and then author the VOBs in Scenarist. You can view the IFO in a software DVD player to test if it worked.
Step 7: Merge the Scenarist files into your project
All that is left now is to merge your authored files with the original dvd files. File rip everything you haven't encoded using DVD Decrypter Then load up each IFO in IfoUpdate. Keep the same options as shown below:


Here you want to keep the original audio and subpicture tables from the original dvd. Otherwise you will end up with the names you assigned in Scenarist. It is a lot easier to not name the streams in Scenarist and just let IfoUpdate do the work for you.
Once this has been done you're basically ready for burning. However, you may want to remove certain user prohibitions (as in not being able to change the audio track via the appropriate button on the remote while watching the movie), make the disc region free, or strip out subtitle and audio channels that you have no included in the re-authored project. You can find all these steps here. Although you may want to keep some user prohibitions in because they may be needed for the DVD to remain functional (like the ability to exit from a white rabbit scene and go straight back to the film instead of the menu).
This document was last updated 11/03/2002.