DVD Shrink 3.1 - Final steps
Once you've configured your project, press the Backup! button to start processing:
![]()
You'll get to another configuration screen:
 If
you have Nero 5 or 6 installed (a demo will do) you'll have three output options:
Burn the movie onto a DVD±R disc (select your burner from the dropdown
list), a Nero disc image (select Image Recoder from the dropdown list),
or simply write the output to your HD (select Hard Disk Folder from the
dropdown list).
If
you have Nero 5 or 6 installed (a demo will do) you'll have three output options:
Burn the movie onto a DVD±R disc (select your burner from the dropdown
list), a Nero disc image (select Image Recoder from the dropdown list),
or simply write the output to your HD (select Hard Disk Folder from the
dropdown list).
In every case, you have to indicate a directory where DVD Shrink will write its output to. In case of burning or disc image, DVD Shrink will burn the disc / create the disc image after encoding.
When you select HD output you have another option:
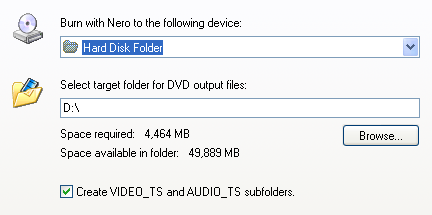 Make
sure that Create VIDEO_TS and AUDIO_TS subfolders is checked at all times.
Make
sure that Create VIDEO_TS and AUDIO_TS subfolders is checked at all times.
In the DVD Region tab you can select a regioncode or make the disc regionfree:

In the Backup Options tab there are some interesting settings:
 You
can check Perform Deep Analysis before backup to improve quality, which
doubles the encoding time, but ensures that the output size is accurate and
helps to increase quality. If you have performed the deep analysis before (by
pressing the Analysis button), this option will not be selectable.
You
can check Perform Deep Analysis before backup to improve quality, which
doubles the encoding time, but ensures that the output size is accurate and
helps to increase quality. If you have performed the deep analysis before (by
pressing the Analysis button), this option will not be selectable.
Check Run backup in low priority mode if you want to use your computer while DVD Shrink is working.
If you like you can also have DVD Shrink shut down your PC once the encoding process has finished. To do this, select Shut down computer when backup is completed.
Finally you can make DVD Shrink play a sound when it's done encoding by checking Play sound when complete and selecting a suitable WAV file.
The Burn Settings tab is only accessible if you have selected to burn the movie
or create a disc image.
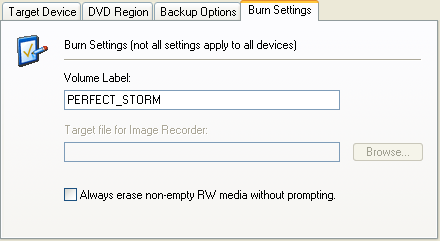 In
that case you can set a label for the disc (image) you're going to create by
using the Volume Label field.
In
that case you can set a label for the disc (image) you're going to create by
using the Volume Label field.
When creating a disc image, you should also fill in the Target file for Image Recorder field. If you don't, DVD Shrink will ask for one when it is ready to create the image (that is after transcoding the movie, so you'll have to wait a while until you get to specify the folder which means DVD Shrink will stop working at some point and you have to come back to the PC for some manual interaction which can be a nuisance).
Finally, when burning the movie, you can check Always erase non-empty RW
media without prompting, which will do just that: erase non empty DVD-RWs
before burning your movie onto the disc. If you don't use this option and use
a DVD-RW disc that contains data, DVD Shrink will just sit there after transcoding,
waiting for you to tell it to erase the disc, which can be pretty annoying so
I suggest that if you plan to use RW discs, make sure that this option is checked.
Then press OK to start encoding / copying.
 During
the encoding process, you can check Enable Video Preview to see what
is currently being encoded. Be aware that this slows down the process.
During
the encoding process, you can check Enable Video Preview to see what
is currently being encoded. Be aware that this slows down the process.
Time Remaining will indicate when you can come back from your coffee break.
Once encoding / copying has completed, DVD Shrink will show you the following screen:
 Press
OK, close the program and you're now ready for burning
(assuming you haven't burned already). Note that you can burn a Nero disc image
in both Nero or DVD Decrypter.
Press
OK, close the program and you're now ready for burning
(assuming you haven't burned already). Note that you can burn a Nero disc image
in both Nero or DVD Decrypter.
In case you opted for direct burning, the screen will look slightly different,
but also informing you about the success or failure of the burning operation.
This document was last updated on January 9, 2004